
CabMaster Software™ allows you to view or modify tables normally located in <your CabMaster folder>/Table folder by using a Lookup Table Editor (QLT Editor).
Tables are opened using the Lookup Table Editor (TableEditor.exe), however, you can open a table directly from the applicable folder.
The Form is an interface for the Table. The Table button allows the user to directly edit the table (.qlt) files.
It is strongly recommended that you use the Form when provided and NOT manually update Tables.
Tables can be edited in a general spreadsheet application such as Microsoft Excel but the QLT Editor offers several specific features such as...
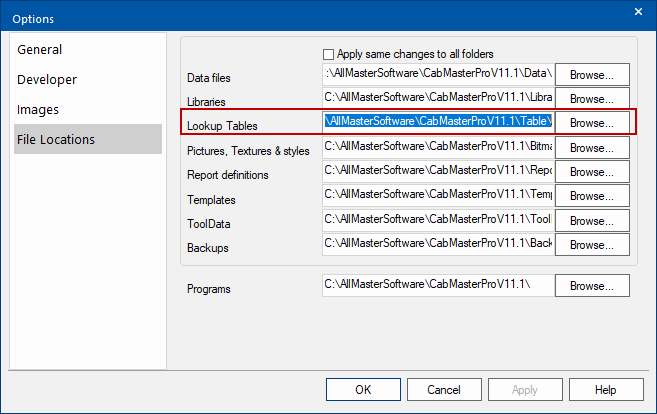
Within your CabMaster software, either use your F10 command key or from the File menu, select Options.
On the File Locations page, select and copy the folder location shown in the Lookup Tables box.
File Locations page and Table Location

Using Windows Explorer, paste the folder location into the address bar.
File Explorer - Paste location

Now you can locate or create your .qlt file in the applicable folder. Open by double clicking on the file.
If a .qlt table file does not open using the Table Editor by default then you will need to...
You can create an empty lookup table at any time by opening an existing table and then from the File menu, select New.
The new table starts off with 2 rows and 2 columns - Click on image to view. When completed, use Save As.
Save an existing table to update the file with the latest content.
Save As allows you to specify the name and location of the file you are saving. This option is chosen when you want to change the name of the file or make a duplicate.
Re-opens the current table as it was when you last saved it.
To add a table column, from the Row menu, select Add.
This will open a New Row Label where you type in the name of row and click OK.
- This will add a new row at the bottom/end of the table as shown by clicking on the image below.
To duplicate a row, click on the row header and from the Row menu, select Duplicate.
This will open a New Row Label, as shown above, where you type a new name of row and click OK.
To move a row, click on the row header and from the Row menu, select Move Up or Move Down.
To delete a row, click on the row header and from the Row menu, select Remove.
To add a table column, from the Column menu, select Add.
This will open a New Column Label where you type in the name of column and click OK.
- This will add a new column at the end of the table as shown by clicking on the image below.
- Use the drop list to select the type of data.
- To edit/change the column heading, double click on header and type in new details.
To duplicate a column, click on the column header and from the Column menu, select Duplicate.
This will open a New Column Label, as shown above, where you type a new name of column and click OK.
Move Column
To move a column, click on the row header and from the Column menu, select Move Left or Move Right.
To delete a column, click on the column header and from the Column menu, select Remove.
Lookup tables normally require that you put several sets of quote marks around text, for compatibility with Excel and other spreadsheet programs. There is no need to worry about this in the Lookup Table Editor as it takes care of multiple quoting of strings for you. However, you still need to put one set of quotes around a string just like you would in CabMasterPro, otherwise they would not be recognised as text at all. Use the <none > option to put quote marks around all strings.
Heading type list
To edit a Lookup Table use your mouse to click on :-
- Row and Column headings - Double click on the header and type in new details.
- Cells - Simply click on a single cell and type in new details.
- Select all of the cells in a row or column with a single click.
- Highlighting a range of cells, just click and drag the mouse across the cells. (In same way as in Excel)
To finish editing a cell/heading :-
- to move down a column, use the <Enter> key
- to move across a row, use the <Tab> key
- use keyboard arrow keys to move between cells (only if table is not in edit mode)
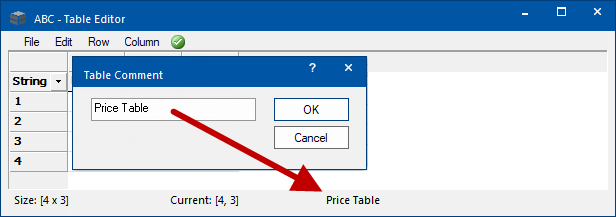
The table description is a data field which is not used by CabMaster and is for the benefit of the person editing the table. The current description for a table is shown in the status bar. Use the Table Comment command to change the comment, which will be saved with the table.
Example of Table Comment

The Find and Replace dialogs allows you to search for instances of a particular text fragment within the table, and then to replace them if desired with another piece of text.
Find
To use the Find dialog :-
- Type in the text that you would like to find in the Find what: text box.
- Clicking on the Find Next button will locate the next instance of that text within the table, and it will become highlighted.
The check boxes modify the behaviour of the find function :-
- Match entire cell text : When enabled, matches exact text.
- Match case : When enabled, makes the search case-sensitive. By default, search is case-insensitive.
Replace
To use the Replace dialog :-
- Type in the text that you would like to find in the Find what: text box.
- Type in the replacement text in the Replace with: text box.
- Clicking the :-
- Find Next button will locate the next instance of that text within the table, and it will become highlighted.
- Replace button will (1) find the text in the Find what field and (2) replace it with the contents of Replace with field.
- Replace All button searches through the entire table and replaces each instance of the searched for text with the given replacement text.
The check boxes modify the behaviour of the find function :-
- Match entire cell text : When enabled, matches exact text.
- Match case : When enabled, makes the search case-sensitive. By default, search is case-insensitive.
Increases the value of all cells in the current row, column or selection according to the value entered.
By Fixed Amount - Adds the selected amount to the row/column's cells.
By Multiplier - Multiplies the row/column's cell by this value. For example, 0.5 would halve all values.
By Percentage - Multiplies the row/column's cell by this percentage. For example 200 would double all values.
Sort rows down the table by their row header.
The top left cell in a table is not used by CabMaster and can be used to hold any information you like. In the image below it is blank (i.e. <none>). It is typically used to show what the column and row headers of the table are listing.
The QLT Editor determines the row and column counts when you save the table. These row and column counts are also checked when you open a lookup table, and you will be warned if they are incorrect. The counts will be automatically fixed next time you save the table.
To see row/column counts and table comment, you need to have your cursor on a cell.
Otherwise you will only be advised that the table is Ready for editing.
If you make changes to a table and then use the close button  (i.e. you have not saved), then the following message will be presented :-
The menu's also show you the Keyboard shortcuts, if available, which can be useful for saving time on some of the more common events, for example Ctrl+C (Copy) and Ctrl+V (Paste).