In This Topic
The Timber Panelling cabinet allows profiled or rectangular slats to be repeated along the edge of a customisable shape of up to 20 points.
There is also a regular 'Panelling' cabinet that behaves in the same way, but does not include any timber slats.
Cabinets not in your Catalog?
These cabinets may initially be missing from your CM-Cabinets catalog if you installed CabMaster prior to V11.100. In order to add these cabinets to the catalog, see the topic on Adding missing cabinets to catalog.

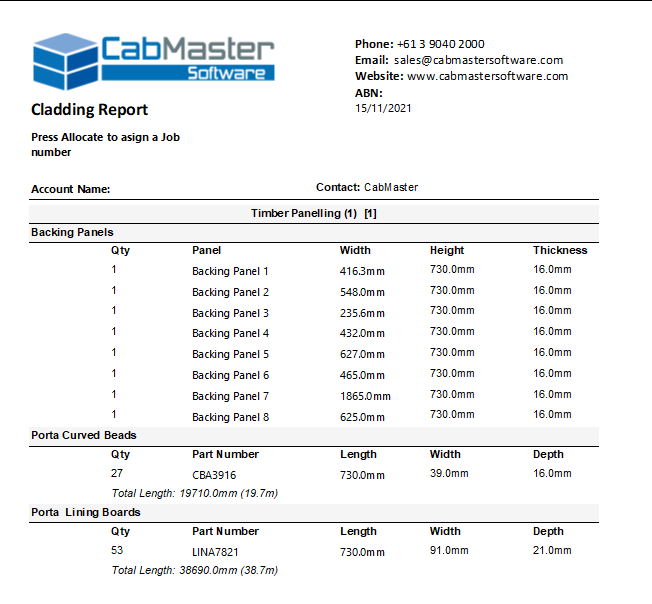
The Panelling cabinets are for 3D displays and do not provide any machining components but also include a report, called Timber Cladding.rdl, that tells you the part number and dimensions of the required slats for easy ordering of these timber panels and also tells you the backing panels required.
You can customise Timber Panelling cabinets for:-
To locate information about any options on the following images,

click on the area of interest.
Detail
The Detail category allows you to customise the overall dimension, kickboard and shape design of the timber panelling.
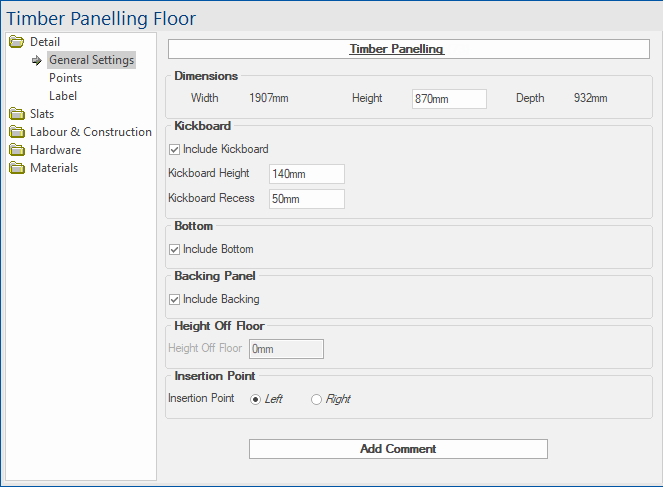
Dimensions
The overall sizes of the timber panelling cabinet.
Width
-
Displays the overall width of the panelling cabinet.
Height
-
The height from the floor to the top of the panelling cabinet.
Depth
-
Displays the overall depth of the panelling cabinet.
Kickboard
A kickboard can be added to the timber panelling cabinet for situations where it does not extend all the way to the floor. This is visual only and does not get output for machining.
Kickboard Height
-
The height of the kickboard.
Include Kickboard
-
Turns the kickboard on or off.
Kickboard Recess
-
The distance from the back of the panelling to the front of the kickboard.
Bottom
The bottom is a carcass panel that fills in the bottom area of the timber panelling cabinet. This is visual only and does not get output for machining.
Include Bottom
-
Turns the bottom on or off.
Backing Panel
The Backing Panels are the vertical parts that sit behind the timber panelling. These are visual only and do not get output for machining.
Include Backing
-
Turns the backing panels on or off.
Height Off Floor
-
The distance from the floor to the bottom of the timber panelling cabinet. This option is only available when the kickboard is disabled.
Insertion Point
-
The distance from the floor to the bottom of the timber panelling cabinet. This option is only available when the kickboard is disabled.
Points
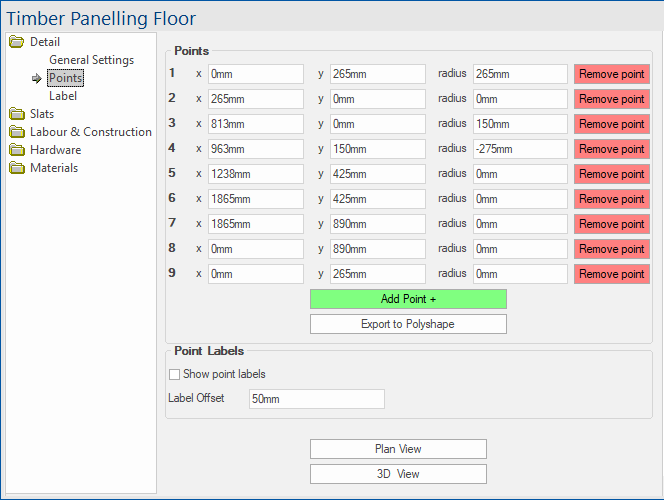
Points
The points group box contains all the controls for adjusting the shape of the timber panelling cabinet. The panelling cabinet is defined by a series of points, which are joined together to form the overall shape.
X
-
The x (left/right) coordinate for the current point.
Y
-
The y (front/back) coordinate for the current point.
Radius
-
The radius of the arc from the current point to the next point.
Remove Point
-
Deletes the current point.
Add Point
-
Adds an extra point to the shape (up to a max of 20).
Export to Polyshape
-
Copies the points to the clipboard, so they can be imported into the polyshape so you can machine parts such as a base or benchtop substrate etc. as seen in the image above.
Point Labels
Show point labels
-
Adds a number label for each point to the plan view to help identify which point is which.
Label Offset
-
The distance between each point and its corresponding label on the plan view.
View Shortcuts
Plan View
-
Changes the preview pane to show the plan view of the timber panelling cabinet.
3D View
-
Changes the preview pane to show the 3D wireframe view of the timber panelling cabinet.
Label
The Label page contains various controls for affecting the cabinet label that is shown on the plan view.
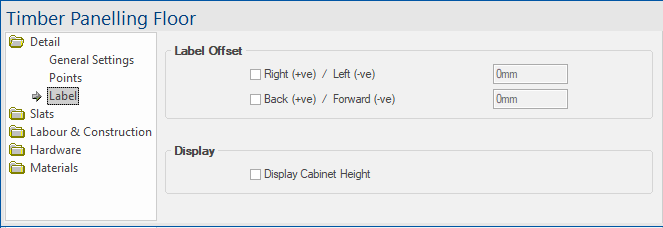
Label Offset
Right (+ve) / Left (-ve)
-
Moves the cabinet label left or right. A positive number will move it right and a negative number will move it left.
Back (+ve) / Forward (-ve)
-
Moves the cabinet label backward or forward. A positive number will move it backward and a negative number will move it forward.
Display
Display Cabinet Height
-
Shows the cabinet height on plan.
-
Slats
You can configure the slats to have curved or straight edges, to be profiled or rectangle, and to be spaced evenly, as seen in the image below.
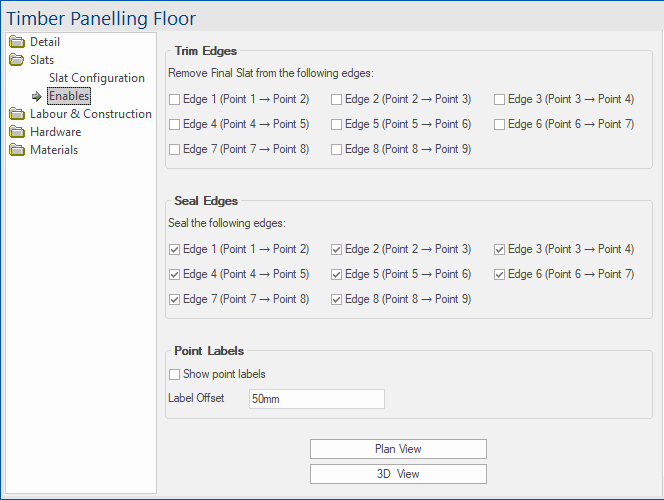
The Enables page also allows you to manually remove individual slats to suit your specific requirements.
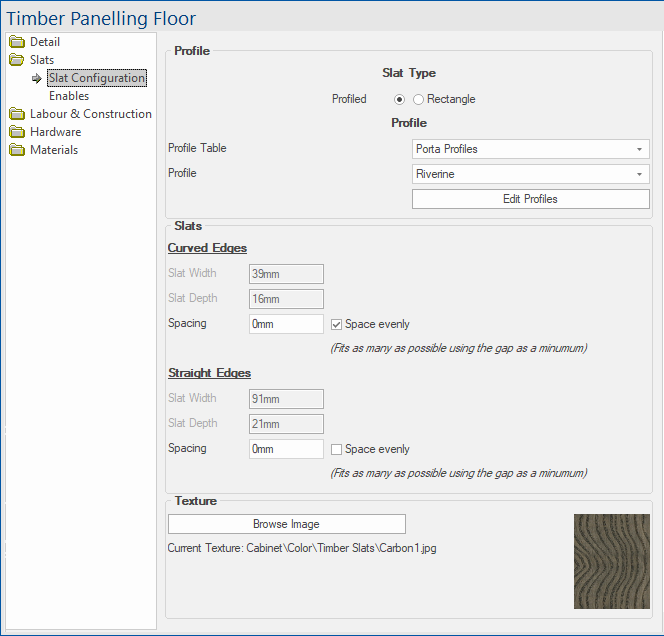
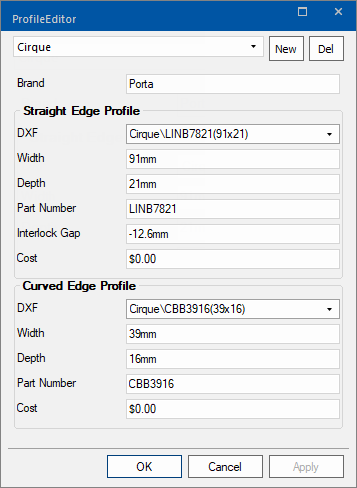
Profile
Slat Type
-
Can be set to either Profiled or Rectangle. Setting the slat type to...
-
- Profiled will use the selected slat profile for the slats.
- Rectangle will just use regular rectangle panels with no profile.
Profile Table
-
The profile collection to use. Each profile table contains individual profiles within it that can then be selected.
-
(Only available when the slat type is set to Profiled).
Profile
-
The profile to use for the slats.
-
(Only available when the slat type is set to Profiled).
Edit Profiles
-
Opens an form-editor window where you can edit/add profiles in the selected profile table.
-
(Only available when the slat type is set to Profiled).
Slats
The slats are the panels that are repeated along each edge of the timber panelling cabinet.
They can have two different configurations, depending on whether the edge they are being applied to is curved or straight.
Curved Edges
-
The settings under this heading apply to any slats on the curved edges of the timber panelling shape.
Straight Edges
-
The settings under this heading apply to any slats on the Straight edges of the timber panelling shape.
Slat Width
-
The width of each individual slat.
-
(Only editable when using Rectangle slats. Profiled slats will read directly from the profile's configuration in the table).
Slat Depth
-
The depth of each individual slat.
-
(Only editable when using Rectangle slats. Profiled slats will read directly from the profile's configuration in the table).
Spacing
-
The distance between each slat.
Space Evenly
-
Overrides the spacing of the slats to fit as can fit on each edge without extending past the end of the edge.
-
Using this method treats the Spacing as a minimum distance, instead of an exact value. The actual spacing will be different per edge.
Texture
The texture groupbox shows the image being used for the 3d view of the slats, and allows it to be adjusted.
The file path for the image is relative to the Bitmap folder of the CabMaster install file paths.
Browse Image
-
Clicking this button will open a file browse window, where a new image can be selected for the slats.
The Enables page contains controls for turning certain edges or slats on or off.
Trim Edges
Remove Final Slat from the following edges
-
Ticking any of the checkboxes under this heading will remove slat at the end of the corresponding edge of the timber panelling shape.
-
This is mainly used when the Space Evenly option is disabled, since the last slat on some edges may extend past the edge of the shape when the spacing does not fit perfectly along that edge. A checkbox will automatically appear for each edge of the shape.
Seal Edges
Seal the following edges
-
The checkboxes under this heading control whether an edge is sealed or not.
-
When it is unticked, the corresponding edge will have its slats, backing panel, and kickboard removed.
Point Labels
Same as Point Labels on the Details > Points page.
View Shortcuts
Same as View Shortcuts on the Details > Points page.
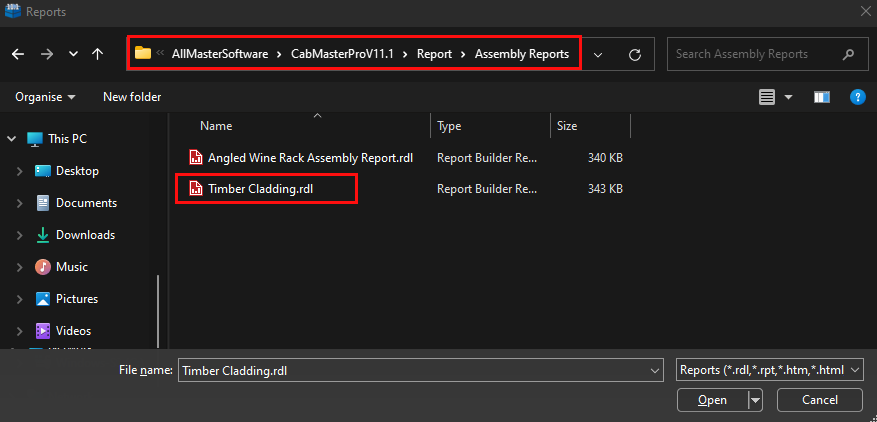
Although the Timber Panelling cabinets do not provide any machinable parts, there is an accompanying report which will tell you the size of each backing panel, as well as some more detailed information about the slats themselves.
The report is called Timber Cladding.rdl and is located in the Assembly Reports folder.
Below is a sample output of the report:
Video
See how to add Timber Panelling to your drawing. (1:18 mins)
See Also