click on the area of interest.
The Display > Options page allows you to set how the job/drawing is displayed.
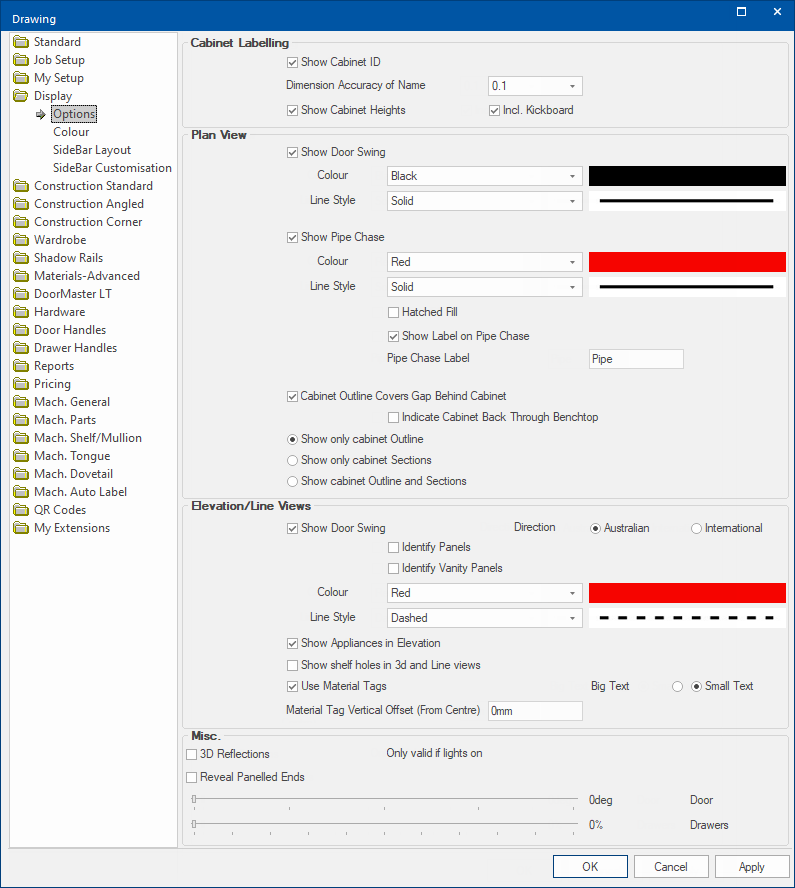
Cabinet Labelling
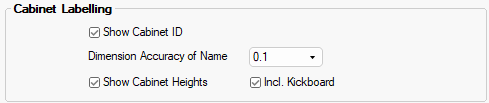
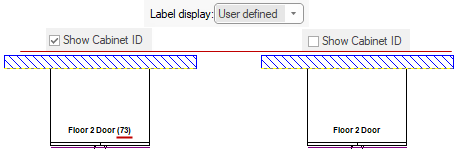
Show Cabinet ID
If enabled and the View Options [F9] Label Display is set to User defined, then the Cabinet ID, that is automatically assigned when placed on the drawing, is displayed on the plan, as shown. See also the tutorial on Cabinet Label Display  .
.
Cabinet ID is always displayed on the Cabinet Information button etc. To renumber, use the commands on the Insert tab of the CabMaster Ribbon
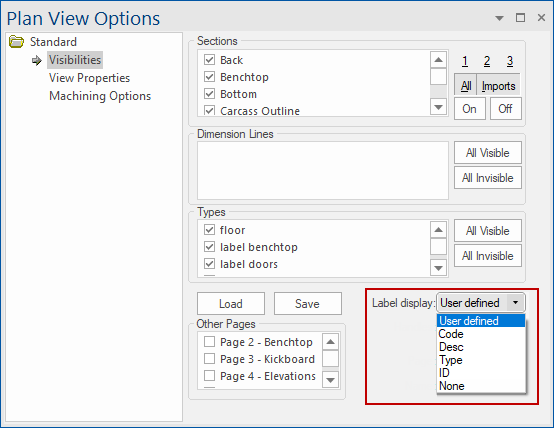
Plan View Options - Label Display
The Visibilities page of the View Options allows you to set the Label Display.
Show Cabinet Height with/without Kick
The Show Cabinet Height option allows the cabinet height on to be shown on the plan and works in conjunction with the Display Cabinet Height option at cabinet level i.e. both checkboxes need to be ticked.
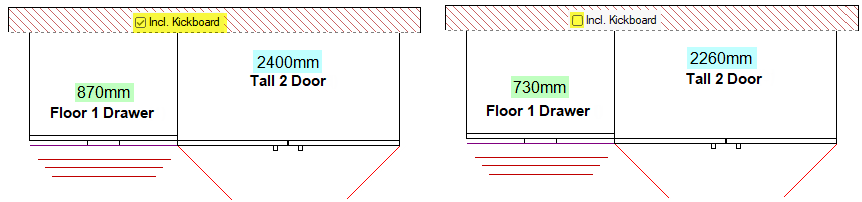
If the 'Include Kickboard' checkbox is ticked, then the cabinet height will include the kick height e.g. 730mm + 140mm = 870mm
Click to view 'Display Cabinet Height' at cabinet level
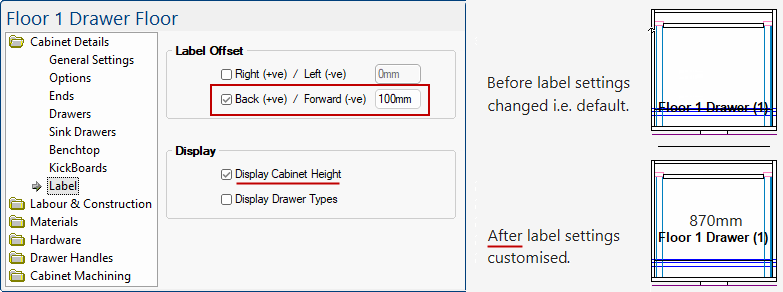
Label Offset
The options on the Cabinet Details > Label page can be used to Offset Labels for clarity, as shown.
Note also that the option to 'Display Cabinet Height' will only work if the Show Cabinet Height option on the Display > Options page of the Drawing Properties is also turned on, as discussed above.
Plan View
Door Swing
When Show Door Swing option is enabled, you can change the Colour and Line Style using drop lists.

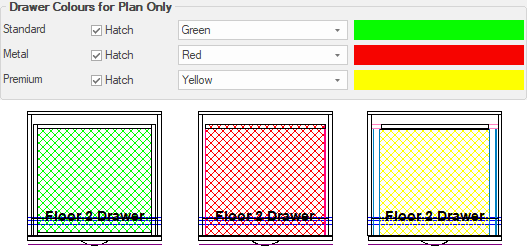
As shown in the plan view image above, the drawers are also displayed with the added benefit that the number of drawers is indicated i.e. even though the Floor 1 Drawer cabinet is placed on the plan, the quantity of drawers was obviously changed to 3, as indicated by the three lines under the cabinet.
Pipe Chase
When Show Pipe Chase option is enabled, you can change the Colour and Line Style using drop lists.
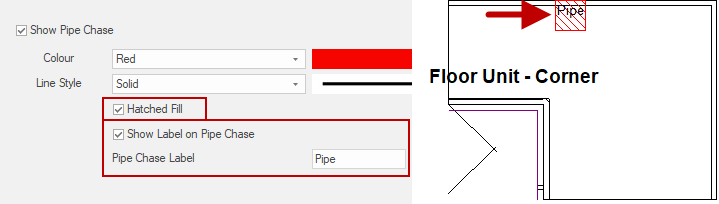
There is also a Hatched Fill option which can be turned on/off.
The Show Label on Pipe Chase option allows you to type in a Pipe Chase Label e.g. Pipe.
Cabinet Outline
The Cabinet Outline Covers Gap Behind Cabinet option can be used to turn on/off the outline for the carcass area including any gap.
The following, are examples, of what is displayed in Plan View when checkboxes are ticked/unticked.
- Option selected/On - the outline for the carcass area including any gap at the back of the cabinet.
- Option not selected/Off - the outline will expose any gap but not any back recess.
- Option selected/On with Indicate Cabinet Back Through Benchtop - includes a dotted line indicating the back of the cabinet.
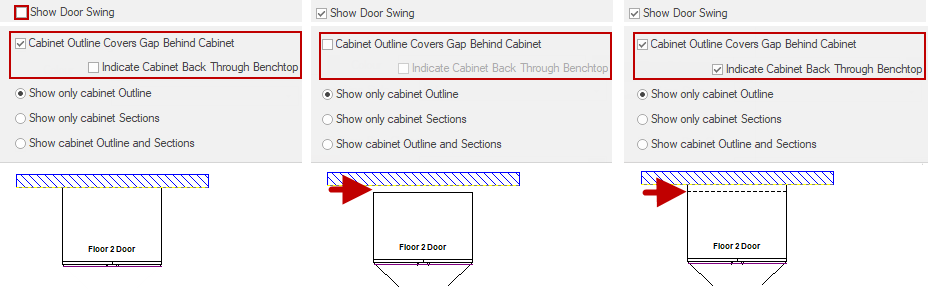
Examples have a Gap Between Cabinet and Wall of 50mm which is set on Cabinet Details > Options page.

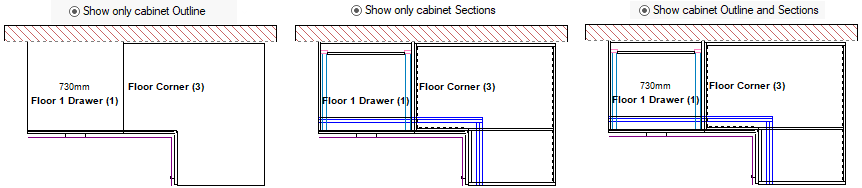
Cabinet Sections
Radio buttons allow you to Show only cabinet Sections or a combination i.e. Show cabinet Outline and Sections.
- Differences may not be obvious, as per following examples, but may be useful in some circumstances e.g. where cabinets details appear on the outline or the outline covers the gap behind a cabinet.
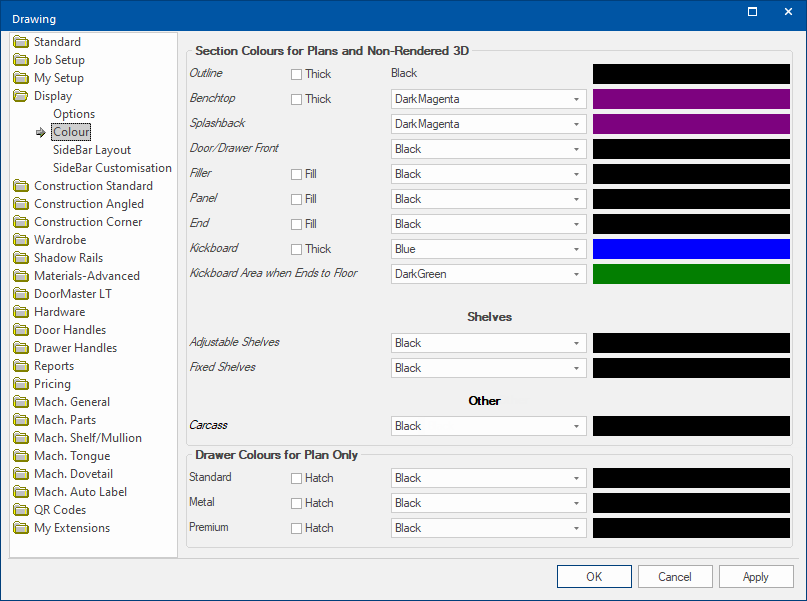
The colour of sections displayed are controlled on the Display > Colour page.
Click to view Colour page and the Cabinet Details > Label page which allows you to offset cabinet labels.
Sections displayed are controlled using the View Options [F9] command button on the View tab.
Control which cabinet sections will appear in both 3D and plan views. It is may be useful for speeding up the generation times of your 3D views.
For example, if you are displaying the doors of your cupboards, you cannot see anything inside. Therefore, you may want to turn off the display of all internal sections, such as shelves.
Plan View Options - Sections
The Sections for the Back and Bottom have been turned off for comparison.

The cabinet labels can be moved up/down and left/right for clarity - see tip on Label Offset above.
This only works in Plan View i.e. it has no affect when in Elevation View - see Displaying Cabinet ID in Elevation View .
Elevation/Line Views
Door Swing
When Show Door Swing option is enabled, you can change the Colour and Line Style using drop lists.
This option applies to both the 3D View and Elevation View but the Line Style applies only to the Elevation View, as shown.

The Direction of Door Swing can be set to Australian or International using the radio buttons.
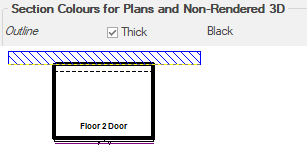
The default is 'Dashed' but if 'Solid' is preferred then an extra checkbox 'Thick' is provided.

Identify Panels
The Identify Panels checkboxes provide an added means of pinpointing Panels, as shown.
Note that this option will only work if the Show Door Swing is ticked.

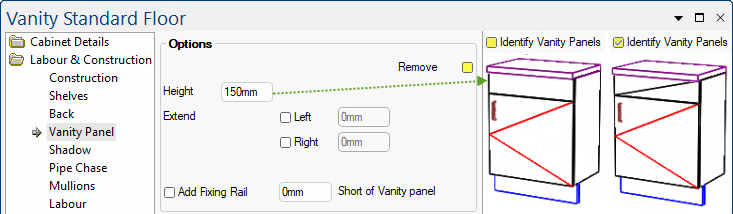
Identify Vanity Panels
The Identify Vanity Panels checkboxes provide an added means of pinpointing Panels, as shown.
Note that this option will only work if the Show Door Swing is ticked.
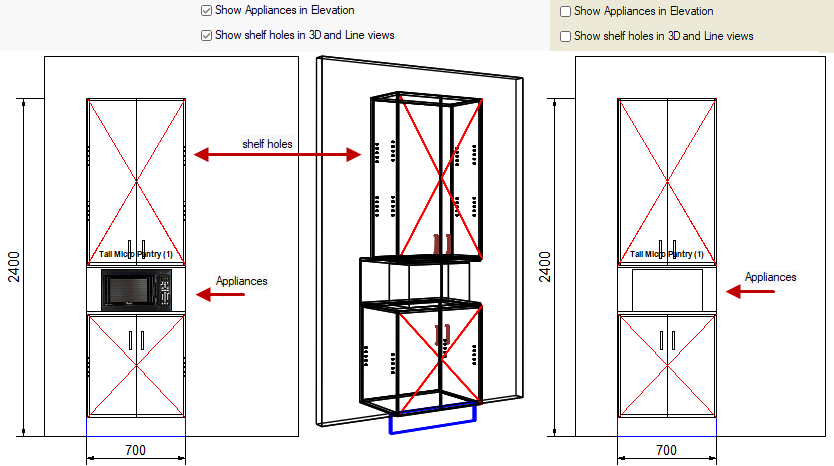
Show Appliances and/or Shelf Holes
Appliances can be displayed in Elevation View by ticking this checkbox.
Material Tags
If the Use Material Tags option is enabled, tags will appear over the Doors and Drawers of the cabinets in the Elevation View.

Text Size and Offset
The radio buttons allow you to set the text to Big or Small font, which can be offset by a specified amount, vertically from the centre.
Text shown is set in the relevant Drawing Properties Materials-Advanced > Door page. Drawers reflect the setting on the Door page.
The Text and Offset can be overridden at Cabinet Level in the Local Properties.
Image of Elevation View with Material Tags enabled with examples of Text Size and Offset
These two examples show the use of Material Tags in (1) Small Text offset 100mm from centre and (2) Big Text without offset i.e. 0mm

Elevation View of Floor Door cabinet - Click to view Drawer cabinet which reflects Material Tag of Floor but can be changed at Cabinet level
Miscellaneous Options
3D Reflections option can be turned on but will only work if lights are on.
Reveal Panelled Ends option can be turned on/off.
Sliders for ‘Doors’ and ‘Drawers’ can be used to show them in open position in 3D.