
Drawer runners, along with their associated machining details, are stored across a number of tables that are brought together when drawers are used.
The Runner Editor allows all the tables associated with a drawer system to be edited from one place in a simple and graphical method using a Properties Inspector. In fact, rather than editing the original table, it can create a set of 'Override' data for the changes made locally. This allows for any of the original tables to be re-downloaded from StoreMaster (the download site for CabMaster Hardware and Materials).
The Runner Editor deals allows you to manage overrides of individual runner properties that make up a Runner Set (also discussed in this section). It is not provided to create new tables, just to override the settings in existing ones. You can however duplicate an original table and rename it i.e. create a new based on table.
CabMaster Software™ distributes most of the runner tables and allows customers to tweak them for their use using the runner editor and are written to a separate override file and so preserving the original (unless you use the 'View original table' option to edit them - which is not recommended).
The Runner Editor can be accessed from the Catalog/Drawing Properties on...
or
or any other place where previously the table could be edited.
The main Runner Editor page allows selection of the runner's...
 ;
;
The following discusses each of the available buttons and associated pages.
Complete Reset
Note that if you change your mind after making changes to the chosen Runner, the buttons at the bottom of the main Runner Editor page shown, allows you to...
- Reset ALL the overrides for the chosen Runner and Length e.g. Complete Reset for 250mm;
or- Reset ALL the overrides for All Lengths of the chosen Runner.
The radio buttons and Folder drop list allows you to select tables that are in the applicable sub-folder of the '...\Table\DrawerRunners folder'.
Clicking on the Up Folder  button allows you to select tables that are not in the above mentioned sub-folders, as it moves you up to the parent folder (it is not a browse feature) - as valid tables will not exist outside of this structure - click on above image to view.
The Runner Editor is not provided to create new tables, just to override the settings in existing ones. You can however duplicate an original table and rename it i.e. create a new based on table (discussed next).
CabMaster Software™ distributes most of the runner tables and allows customers to tweak them for their use using the runner editor and are written to a separate override file and so preserving the original (unless you use the 'View original table' option to edit them - which is not recommended).
 opens up the original table for the associated feature using the Table Editor.
It is not recommended to edit the original table directly!
Note that any changes made using the Runner Editor interface does not the override data in the original table. This button only should be used to View the table - this may be useful for users familiar with the structure (click on image to view example).
Extra Notes on Format of Tables
The following discusses on the format of Drawer Runner Group tables.
Once a row in the table has been selected the remainder of the properties in that row are loaded and used.
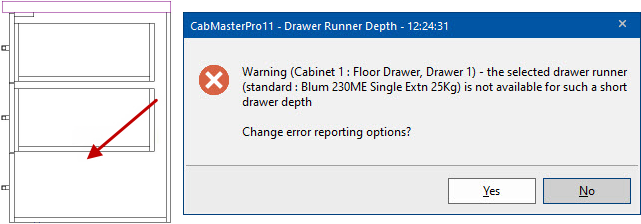
An extra row at the bottom of all the tables is labelled as -50mm (Click on image above). This means that if a drawer depth specified is less than any available runner, it will pick the 50mm.
This will show in the cabinet thumbnail as a small drawer and also cause CabMasterPro to give a message warning (as shown below) of the invalid sized drawer.

The  View Original Table button can be used to open a table and create a new table based on a selected (original) drawer runner table - see note.
To do this, open the Runner Editor and select a ....
Example of Runner Editor Properties and above selection criteria
Example of renaming and saving the based on table
In this example, the main file name has been retained and the word 'Bin' added.
 button opens the relevant Online Help pages for editing runner tables for the chosen Type.
 buttons against each option will show applicable help text and/or a picture in the right hand side of the page.
Context Help is also available on all Property Sheets, simply open (as shown below) and click on the Context Help  button and then anywhere on the relevant page.

Saving can be done for just the selected length or the same value can be saved for all lengths.
There are Save and Reset/remove buttons for each group of configuration data...
and overall Save and Reset/Remove buttons at the foot of each page, these save/remove all groups at once for the chosen or all lengths.
Ensure you save before closing. Leaving the page without saving will not automatically save the overrides.
Remember that if you change your mind after making changes to the chosen Runner, there are the options to do a Complete Reset on the main page of the Runner Editor.

Once a runner is selected the selected table is displayed. Buttons are provided to allow relevant changes by providing a Form.
A single page editor that allows just the 'Commercial' configuration data to be overridden (such as the Cost, Part number etc), discussed below.
For more on how pricing is calculated, see the Pricing Drawer Runners tutorial.
A single page editor that allows you to associate the runner with a supplier.
Select the 'Supplier' table/list and the supplier within that table and ensure that you Save changes.
Supplier Table: Multiple supplier tables are supported. Users are at liberty to create customised tables.
For more on how to create a supplier, see discussion on Supplier Editor located on the Hardware > Managers page.
You can browse for a model to provide a visual aid. The best place to save any images is in the Bitmap folder.

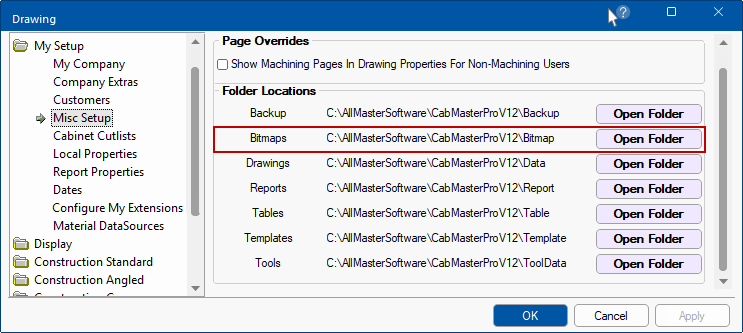
To locate CabMasterPro folders, refer to the My Setup > Misc Setup page, where buttons are provided for your convenience.

A multi page editor that allows groups of Configuration data (or all configuration data) to be edited.
Each page has Help buttons against related options, with help text and/or a picture applicable on the RHS of the page or locates online help.
The Runner Configuration category provides access to each group of options i.e. one on each page, as shown below.
Help buttons against each option will show help text and/or a picture applicable to that option in the right hand side of the page.
Help buttons against each option will show help text and/or a picture applicable to that option in the right hand side of the page.
The picture shown below shows that the Gap is the width space between the carcass end and the drawer box side.
Buttons are made available if table data is applicable for the type of drawer runner selected. Hovering over the button will provide a tool tip, as shown above.
To the right side of the Holes buttons there is an option to turn its use on  /off
/off  and the name of the table in use.
Each of the Holes editing pages operate in a similar fashion and are discussed below.
Holes or Custom buttons are greyed out (and may also have a red cross  ) if either their use is turned off or no table is specified.
Leaving the page without saving will not automatically save the overrides.
The values can be overridden and then saved (or already saved options removed) by using the buttons at the foot of the page. Saving/Removing can either be done for just the chosen length or for every single length in the runner system (which saves the same value for every single length).
See Also: Drawer Runner Machining Explained and topic on Drawer Runner : Calculating Hole Position
A single page editor to override the runner holes (the holes in the carcass that support the runner).
Runner Holes page
A single page editor to override the second set (if used) runner holes (the holes in the carcass that support the runner).
A single page editor to override the Extra holes (the construction holes for the drawer box itself e.g. for connecting the Back and the Base of the drawer box).
Extra Holes page
A single page editor to override any additional holes in the drawer box Back (such as those that connect the metal sides to the drawer box back).
Back Holes page
A single page editor to override any additional holes in the drawer box Bottom [Base] (such as those that connect the metal sides to the drawer box base).
Bottom Holes page
A single page editor to override any additional holes in the drawer box Side.
A single page editor to override any additional holes in the drawer box Front.
Front holes can include donated matching holes in front panel.Front (Inner) Holes
The runner configuration tables for the drawer box fronts can include holes that are transferred to the drawer front panel - circled below.
A single page editor to override any additional holes in the drawer box Drawer Front [Panel] (such as those that connect the metal sides to the drawer front).
Drawer Front Holes page
Leaving the page without saving will not automatically save the overrides.
Overrides for these on/off settings can be saved or any overrides removed, for just the chosen length or all lengths, using the buttons below.
Shows any Custom Machining Tables being used on the drawer box back.
Shows any Custom Machining Tables being used on the drawer box base.
Shows any Custom Machining Tables being used on the drawer box sides.
Shows any Custom Machining Tables being used on the drawer box front.
Shows any Custom Machining Tables being used on the drawer front.