Materials-Advanced : Defaults
In This Topic
Material defaults should be set up in the even though materials commonly change with each job.
The Materials-Advanced pages and Job Setup > Materials provide a way to select and change materials at level.

Click to view pages discussed
As most pages discussed below use similar functionality the same instructions apply. For example Material drop lists and Part within Type selection, as well as Reset and Refresh. Therefore the functionality will be covered once and thereafter referred to.
Headings are collapsible - click to hide/show.
Carcass Material
Carcass page
Carcass Options
Radio buttons in the Carcass group of options allow you to select how the Carcass material is defined:-

Click to view Materials-Advanced > Carcass page with 'Carcass as Panel' ticked
- Select for each Carcass part
- All carcass parts default to the same selected material, but can be overridden per Part using the additional Parts Carcass page this option makes available.

Click to view Group headings changed to (Default)
- Select for each Carcass part - by Type
- All carcass parts default to the same selected material, but can be overridden per Part within each Type using the additional Floor, Wall and Tall Carcass pages this options makes available (see Extra Notes)
- use radio buttons on this page to choose each part (e.g. Top, Bottom, Shelf etc.) to select its material in a similar way to the Carcass Edging page discussed below.

Click to view additional pages i.e. Floor Carcass, Wall Carcass, Tall Carcass
Extra Notes - Floor, Wall, Tall Carcass pages
These pages are only made available when Select for each Carcass part - by Type is on.
The All As (part) option button allows you to set the material for all other parts to the currently selected part. Individual parts can then be changed to a different material, for example if using 'ply' backs.

Floor Carcass page options - Click to Expand
- Carcass as Panel
- This option is only available when Same as all Carcass is selected.
- It makes the Carcass material the same as is chosen for Panels.
- Report 'Carcass as Panel' material
- Reports carcass parts made from panel material as either Carcass or Panel
- Used in conjunction with the Carcass as Panel checkbox discussed above or can be overridden at Cabinet level.
Board List report: Carcass vs Panel
To see the difference, click on the following images which shows a Board List report for a Floor 2 Door.
Example 1 - Report materials as Carcass

Click to view Board List report
Example 2 - Report materials as Panel

Click to view Board List report
Material drop lists
The Carcass page allows you to change the Board, Edge and Internal Edge by using the drop lists to locate the required material for the Job/Drawing:-
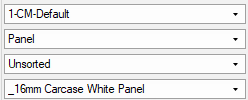
- DataSource - this example, CM-Default
- Material Type - this example, Panel
- Material Group - this example, Unsorted
- Material Name - this example, _16mm Carcase White Panel
- The colour of material is displayed as well as the image of cabinet parts.
Refresh
If you make changes to the material, you must click the Refresh button. See image of Carcass page below.
Temporary Materials
'Temporary' defined materials can be used without having to add them to a predefined table.
When the option on the My Setup > Materials DataSource page is enabled you will see Edit buttons (see image below in drop section) against all the drawing property materials, allowing the definition (name, colour, thickness, price etc) of the material to be overridden in the current drawing only.
Image of Carcass page with/without Temporary Materials enabled
This is the Carcass page with Temporary Materials option turned off (default) on the My Setup > Materials DataSource page.
- Click on the image to view the same page with the Temporary Materials option turned on.

Click to view same page with My Setup > Materials DataSource Temporary Materials option turned on
Edge Materials on the Carcass page vs Carcass Edging page:-
- The Carcass page, discussed above, sets a default for the whole job.
- The Carcass Edging page, discussed next, allows that default to be overridden per Part within Type.
Carcass Edging page
The Carcass Edging page allows you to specify for each part within each type the sides which are to be edged, along with the ability to override the edging material.
Part within Type selection
This is done by:-
- First select the Part using the radio buttons in the Floor/Wall/Tall type group:-
- Example: Type = Floor, press the Top radio button
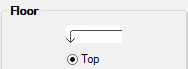
- Note that the selection made here is reflected in the heading in the next section, in this example Floor : Top
 button resets all the materials back to the default carcass edging set on the Carcass page. Of course, if you haven't made any changes on this page then you will not see a difference when Reset is pressed.
 button refreshes the selected material data by reloading it from the material table.
- Then enable by ticking the Edges required to have edging applied.
- Note that heading reflects above selection.
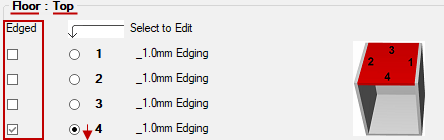
- If you want to amend the edging material, press the relevant radio button (# relating to picture)
- Example shown above: Radio button 4 pressed (This will change the next heading to Floor : Top : 4)
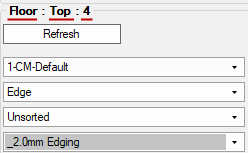
- Use the drop lists for the relevant edge to select the required:-
- DataSource, Type, Group [in this example, unchanged]
- Name of Material - in this example, changed to _No Edging (change will be reflected in description).
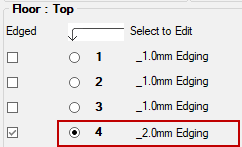
Image of Materials-Advanced > Carcass Edging page reflecting above changes
This example shows Floor : Top : Edge 4 has been changed to have _2.0mm Edging
- Click image to view the selection of another individual part i.e. Wall : Left : Edge 2 changed to _3.0mm Edging

Click to view changes to Wall : Left : Edge 2 using radio buttons to select part
Additional Options
Additional options are available when Shelf and Rail parts are selected, allowing the selection of which sides are edged when:-
- a Shelf is Fixed
- a Rail is a Back Rail

Materials-Advanced > Carcass Edging - Click to view Shelf options
Door Material
Door page
Allows you define materials used for door.
All As Floor
Enabling/ticking the All As Floor option designates that the material for Wall and Tall cabinets are the same as the for the Floor.

All As Floor option enabled - Click to view option Unticked, allowing selection per Wall and Tall type
Untick the All As Floor option to allow separate selection for Floor, Wall and Tall. Use radio buttons to select which to update. (Click on image above to view example).
If you make changes to the material, you must click the Refresh button
Selection criteria is similar to the Part within Type selection discussion for Carcass Material.
This option can also be set on the Materials-Advanced > General Options page. i.e. Door: All As Floor in the Settings group.
Any changes made here will be reflected on the General Options page and vice versa.
If enabled on the Display > Options page, these tags will appear over the Doors and Drawers of the cabinets in the Elevation View.
Material Tags can be set for all Types, i.e. Floor, Wall and Tall, if the All As Floor option is unticked as shown.

Material Tag options are only made available if enabled on the Display > Options page - Click to View
This can be overridden at level if you have some cabinets that are different to others.
Simply go into the Local Properties of the cabinet, by clicking on the Cabinet Information button as pictured below, and edit the Material Tag for that cabinet.
Click on image to see an example of a Material Tag on an Elevation View.

Cabinet Information > Material Tags made available if enabled on the Display > Options page - Click to Expand
Edging
Edging is selected in the same manner as discussed above for individual Carcass parts in that:-
- Is Edged checkboxes are used to designate the required sides to be edged.
- The radio buttons are used to select each edge, one at a time and specified in heading, allowing you to use Material drop lists for selection.
The picture is numbered for use with edging options.
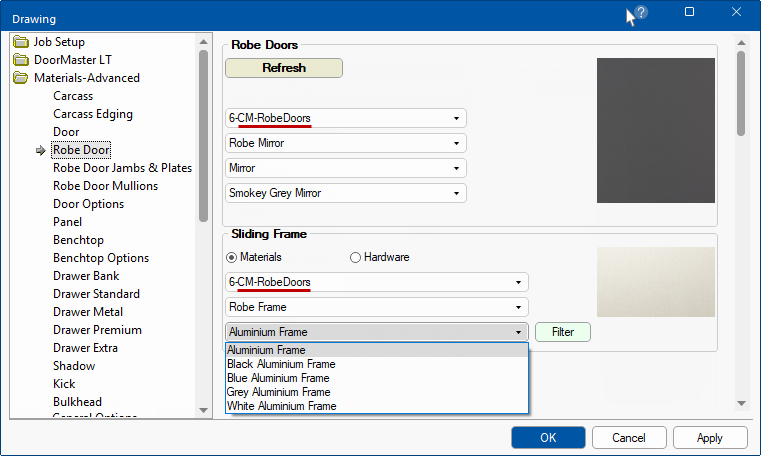
Robe Door page
The default Door Type listed below and corresponding materials are defined here.
- Hinged doors are where door panels are affixed to the frame with hinges on one side, allowing them to swing inwards or outwards.
- Sliding doors have one or more door panels that open by gliding on a track.
- Systems
Materials are selected in a similar manner to the Carcass page. Select the required material in each group of options by using a or radio button provided.
Materials Datasource for CM-RobeDoors is available with default materials for use.
See the topic under Cabinet Design on Robe Doors for a detailed discussion.
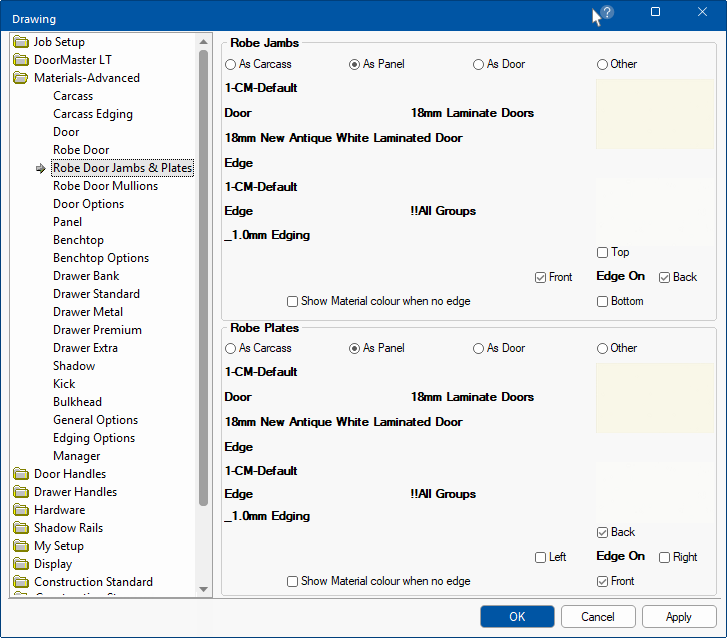
Robe Door Jambs & Plates page
A Robe door jamb is a part of the frame that surrounds the door slab. Commonly includes two side jambs and one head jamb i.e. upper horizontal portion of a frame. Jambs may feature a stops, a strike plate, and hinges.
Plates are pieces that go above and below the door onto which the track fixes, used only when required, e.g. there may not be one at the bottom and the track fixes to the floor.
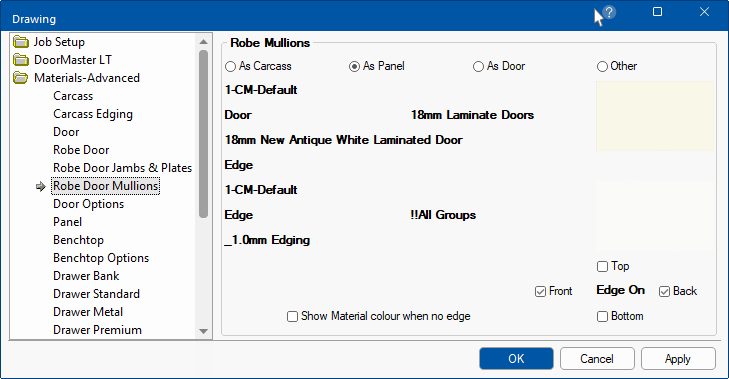
Robe Door Mullions page
A door mullion is a seam that separates individual panels or frames of a door when combined. Called a mull for short.
Door Options page
Glass Door
Select a glass design from the drop list, be it plain glass or some kind of leadlight. It is applied to all glass doors on the entire drawing.
A picture of the selected glass design will be displayed.

Door Options page - Click to Expand
Door Reflections
Reflection options can be applied to Floor and/or Wall and Tall cabinets, if required. These are used for 3D viewing, resulting in a much more life-like image. Simply turn on (as shown) to make the Reflectivity % and Shininess options available.
The Shine values control how sharply the surface reflects light for example, gives a nice polished metal effect on metallic objects. A typical value for Shininess is 10.

Door Options page - Click to Expand
These effects are only applied when lights are added to the drawing.
Price Group
options are only made available if the Use Price Groups option is enabled on the Pricing > Price Groups page in the / Properties.

Door Options page - Click to view descriptive Price Group naming
Upper relates to Wall cabinet doors and Lower relates to Wardrobe, Tall and Floor cabinet doors.
Descriptive names can be created on the
Pricing > Price Groups page. For example Group 1 can be set to Laminate, Group 2 to Gloss etc - click on above image to view.
5 Piece Door Parts
Click on the Edit button to open a property dialog allowing you to change the defaults for Frame, Panel and Arch.

Door Options page - Click to view Property dialog made available
Profile Doors
A range of Door Profiles have been added into for both display and machining purposes if you have software.
Profiles can be selected and viewed/edited on the DoorMaster LT > Profile Doors page of the / Properties.
Panel as Door
Enabling this option will make the Floor, Wall and Tall Panel materials the same as that selected for the doors - see Panel As Door topic.

Panel as Door option enabled - Click to view unticked option
All As Floor
These options are only available if the Panel as Door is turned Off.
Enabling/ticking the All As Floor option designates that the material for Wall and Tall cabinets are the same as the for the Floor.
Untick the All As Floor option to allow separate selection for Floor, Wall and Tall. Use radio buttons to select which to update.

All As Floor option enabled - Click to view unticked option
The All As Floor option is not available when Panel as Door is enabled.
Options discussed above can also be set on the Materials-Advanced > General Options page in the Settings group.
Any changes made here will be reflected on the General Options page and vice versa.
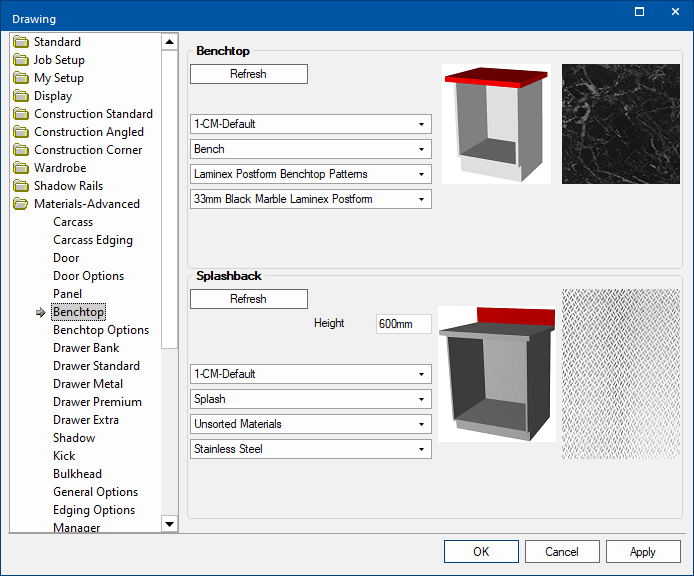
Benchtop Material
Benchtop page
Benchtop and Splashback material can be selected using drop lists. The default height of the splashback should be nominated on this page.
The As Benchtop checkbox allows the Splashback material to be set the same as the selected Benchtop material.
Options to Include Benchtop and Include Splashback can be set on either the...
Any changes made here will be reflected on the General Options page and vice versa.
Image of Materials-Advanced > Benchtop page
Benchtop Options
Pattern

Benchtop Options - Click to view Pattern Repeat options
Rotate
Rotate allows you to nominate if the image is to be rotated 90 degrees, so that the appearance of grain is changed.
Fixed Size
Allows you to determine the size of the image to be illustrated on the drawing plan. For example, if using tiles, a tile is a specific length and width.
Simply press the Fixed Size radio button and then place the width value in the X box and the length in the Y box.
Repeat
Allows you to select how many times the image will be repeated over the entire space that it is required to fill.
Simply press the Repeat radio button and then place a value in the X and Y boxes made available.
You may use this option to sharpen the appearance of the image. For example, you may have a benchtop that is 1200mm long :-
- With the X and Y values set to 1 (click on above to view), the image would be stretched the entire distance.
- However if you set the Y value to 3, the image would be placed on the surface 3 times, each image representing 400mm.
Reflection/Gloss

Benchtop Options - Click to Expand
Glossiness
The shine or Glossiness of a surface determines how sharply it reflects the light in 3D views.
Typical values range from zero for matte surfaces to around 20 or 30 for highly reflective faces. A medium value of around 10 usually gives the best results.
Reflectivity
Reflective properties work best on surfaces that are reflective or glossy in real life, like glass panes, metal sinks, and even polished benchtops. They are more noticeable when the viewpoint is moved around the surface, so the brightness changes dramatically. Curved surfaces show up even better.
These effects are only applied when lights are added to the drawing.
For more information use the F1 help function within your CabMaster software and search for Shine and select topic on Textures.
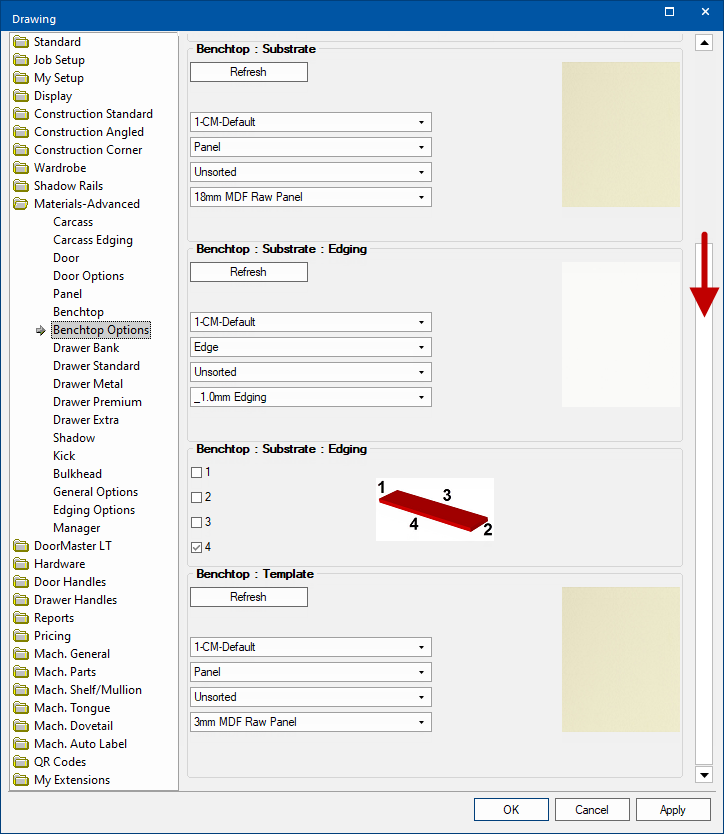
Material and Edging
Benchtop Substrate material and edging can be selected using the drop lists. The Is Edged checkboxes allow you to enable edging on the applicable sides.
Benchtop Template material can also be selected.
Image of Materials-Advanced > Benchtop Options material and edging options
Drawer Material
This section covers Drawer Bank, Drawer Standard, Drawer Metal, Drawer Premium and Drawer Extra pages under the Materials-Advanced category.
Drawer Bank
When the drawer fronts are cut as a single 'drawer bank', they are manufactured as a single door and then this is cut into the individual drawer fronts themselves. This is generally done when the drawer front has a profile or is made of grained (or patterned) material.
Without being a 'drawer bank' these may well be cut out of different parts of the sheet of material, causing a mismatch of the pattern.

Materials-Advanced > Drawer Bank - Click to Expand
These options can also be set on the Materials-Advanced > General Options page in the Drawer Bank group.
Any changes made here will be reflected on the General Options page and vice versa.
Same as Floor Door
When enabled, the materials used will be the same as those selected on the Door page.
If this option is unticked/disabled, then material drop lists will be made available for selection (click on image above).
Report full cutsize only (no recuts)
This ‘drawer bank’ is sized differently for the printed Cutlist (and Optimisation Link output) than for flatbed Machining.
There are two height options...
1) Height with Recuts (unticked option)
The required height of raw material taking into account the size of the saw blade.
Finished - Carcass Height minus Top Gap plus Bottom Gap
Cut - Finished Height minus (Top & Bottom Edging) * Quantity of fronts minus (Gaps between fronts plus Saw Blade thickness) * Quantity of gaps [i.e. Quantity of fronts less one]
2) Height without Recuts (ticked option)
The height of raw material without taking into account the saw blade.
Finished - Carcass Height minus Top Gap + Bottom Gap
Cut - Finished Height minus (Top & Bottom Edging) * Quantity of fronts minus (Gaps between fronts) * Quantity of gaps [i.e. Quantity of fronts less one]
Saw Blade Thickness is set on the Construction Standard > Doors/Fronts page or Mach.General > Tool2 page.
Drawer Gaps are located at Cabinet level on the Labour & Construction > Gaps page.
Use Full Door for Drawer Fronts
If enabled, the drawer fronts will be treated as one 'drawer bank'.
This option makes the drawers on a single cabinet become a complete door with recut values to break into separate parts. Useful if you want to hold drawers in a block to preserve the pattern of the grain. If enabled, this recutting can be completed with a CNC router bit, or a Panel Saw manually. See also discussion on Drawer Fronts Grained.
Force Full Door as Drawer when Grained
Even if the above is not enable but the material is specified as grained in Manager, then the drawer fronts will be treated as one 'drawer bank'.
Drawer Standard
Material can be nominated and an Alternate Drawer Base can be added.

Materials-Advanced > Drawers Standard - Click to Expand
Materials
The radio buttons allows the selection for materials to be based on:-
- As Carcass - materials selected on the Carcass page.
- As Panel - materials selected on the Panel page.
- Other - this makes Materials drop lists available for each drawer component.
The Alt Drawer Base checkbox can be enabled with any of the above selections to make available an alternative material for drawer bottoms, for example in Pot Drawers.
Grain (Drawer Sides and Ends)
The grain direction overrides are available for any material selection and affect both the textured image and the nesting of parts (when exported for machining to EzyNest).
The grain direction in the vertical parts is usually vertical (this may vary depending on the grain direction defined for the material). However, the drawer sided and ends may require horizontal graining. The Grain Override/As Material selection at the top of the drawer pages is a master setting that affects all the drawer's vertical parts of the drawer. This option is available whether the drawer materials are grained material or not (obviously having no impact if a material is not grained).
- As Material Setting - keeps the graining for the vertical parts of the drawer as defined in the material table.
- Override Material Setting - rotate the graining for the vertical parts of the drawer by 90 degrees from that defined in the material table.
Extra Notes on Grain Reset and Override on individual parts
Defining a Grained Material

Manager setting is Grained - Click to view Manager property
The Override/Reset buttons on each of the individual parts (Ends, Sides & Bottom) allows the grain direction to be changed on just that part.
In this example the Rotation option in the Manager has been set to 90 degree (as displayed) and a Reset button will be made available.
- Click on image to view Manager Grained setting enabled with Rotation applied.

Manager setting is Grained with 90 degree rotation - Click to view Manager
Clicking on the Reset button will change back to Default: 0 but will allow you to Override if you change your mind.
- Click on image to view the Grained Properties dialog that is presented when the Override button is pressed.

Click to view Grained Properties Override options dialog
Drawer Metal and Metal Premium
If you are using Metal and Metal Premium systems, then you only need to nominate the material to be used for the back and bottom of the drawer.

Materials-Advanced > Drawers Metal page - Click to Expand
Materials
The radio buttons allows the selection for materials to be based on:-
- As Carcass - materials selected on the Carcass page.
- As Panel - materials selected on the Panel page.
- Other - this makes Materials drop lists available for each drawer component.
Grain options as per Drawers Standard, except not applicable to Sides as these are metal.
Drawer Extra - Spacer Edging
Allows for selection of edges, as per picture, to be edged.

Materials-Advanced > Drawer Extra page - Click to Expand
If Shadow as Panel is unticked, selection of material for Shadow can be made using the Material drop lists and Edging radio buttons, similar to Carcass Edging page.
Alternatively, enabling Shadow as Panel, as shown, will display the material selected on Panel page.

Materials-Advanced > Shadow page - Click to Expand
Additional settings are available on the Materials-Advanced >
General Options page which allows you to make
Backing material
As Carcass and change the
Depth of both the Shadow and Backing.
Kick, Kick Face, Sleeper and Kick Rail material can be individually set:-

Materials-Advanced > Kick page - Click to Expand
As Carcass - see Materials-Advanced > Carcass page
or As Panel - see Materials-Advanced > Panel page
or Other - using the Material drop lists
Options and Reports
Poly reports will include Kickboard cabinets if the Report ...'As Panel' option is Panel (radio button).

This option is also available on a number of other related pages for convenience and any changes will be reflected on these (and vice versa).
See Reports > Board page for more on Kickboard Lists with cabinet ID.
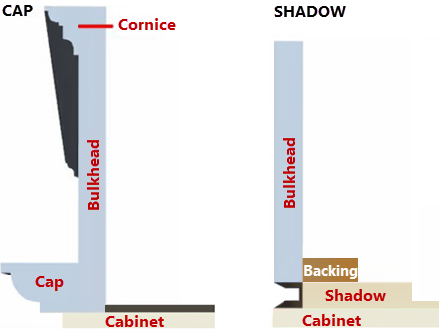
Allows you define materials used for bulkhead, capping, cornice, shadow and backing.
Capping or Shadow
Capping / Cornice / Bulkhead

Materials>Advanced > Bulkhead page - Click to Expand
Off Floor measurement reflects the Overall Kitchen Default Height set on the Job Setup > Job Defaults page.
- The related edit box allows you to set an Offset.
Options to Include and set height/depth are located on the Materials-Advanced > General Options page in the Capping/Cornice/Bulkhead group.
Cornice
Select cornice material using the Material drop lists and set Height.

Materials-Advanced > Bulkhead page - Click to Expand
Bulkhead
As Panel option enabled makes the Bulkhead material the same as is chosen for Panels.
If option unticked, select bulkhead material using the Material drop lists.

Materials-Advanced > Bulkhead page - Click to Expand
Capping
Press the radio button for Capping, which will allow the selection of the capping material using the Material drop lists.

Materials-Advanced > Bulkhead page - Click to Expand
Shadow
Press the radio button for Shadow.
As Panel option enabled makes the shadow material the same as is chosen for Panels. If option unticked, select is made using the Material drop lists.
To make amendments to the material use the Edit button which will open a Properties dialog.

Materials-Advanced > Bulkhead page - Click to Expand
Backing
As Carcass option enabled makes the shadow material the same as is chosen for Carcass. If option unticked, select is made using the Material drop lists.

Materials-Advanced > Bulkhead page - Click to Expand
The Materials-Advanced > General Options page allows you to quickly set the most used options as well as some extra options (for example in the Include group).
Any changes made here will be reflected on the relate page and vice versa.
Include

Materials-Advanced > General Options page - Click to Expand
Include Benchtop can be turned on/off.
Include Splashback can be turned on/off.
Include Kick and Include Kick Face can be turned on/off.
Settings

Materials-Advanced > General Options page - Click to Expand
Door: All As Floor is the same option as on Materials-Advanced > Door page.
Panel as Door and All As Floor options are the same as those on the Materials-Advanced > Panel page.
Shadow as Panel is the same option as on Materials-Advanced > Shadow page.
Carcass
Same options as discussed on Materials-Advanced > Carcass page.
Drawers

Materials-Advanced > General Options page - Click to Expand
Same options as discussed on related Materials-Advanced > Drawer Standard, Drawer Metal and Metal Premium pages.
Note that if you selected Other here, you will have to go to the related drawer page and selected materials.
Grain
Grain Horizontal and Vertical for drawer Sides (Standard only) and Ends as per related drawer pages.
Drawer Bank

Materials-Advanced > General Options page - Click to Expand
Same options as discussed on Materials-Advanced > Drawer Bank page.
Kick

Materials-Advanced > General Options page - Click to Expand
Same options as discussed on Materials-Advanced > Kick page.
Note that if you selected
Other here, you will have to go to the related
Kick page and selected materials.
Capping / Cornice / Bulkhead

Materials-Advanced > General Options page - Click to Expand
Off Floor measurement reflects the Overall Kitchen Default Height set on the Job Setup > Job Defaults page.
- The related edit box allows you to set an Offset.
Use Cornice checkbox can be turned on/off. If turned on, then the related Height edit box allows you to set a height.
Use Bulkhead checkbox can be turned on/off. If turned on, then the related Height edit box allows you to set a height.
- This has an added checkbox for the material to be As Panel.
Use Capping or Shadow checkbox can be turned on/off. If turned on, then radio buttons are used to select either:-
- Capping - if turned on, the related Depth edit box allows you to set a depth.
- Shadow - if turned on, the material can set As Panel (also available on Materials-Advanced > Shadow page).
- An additional setting for Backing to make the material As Carcass is available.
Refresh - Default Material Data
 See topic on Materials Refresh.
The following discusses the Materials-Advanced > Edging Options page
Image of Materials-Advanced > Edging Options page
Edge
Edging Codes will determine the type of edge labelling that will be used on the reports.
- TBLR = top, bottom, left, right
- 2L2S = two long, two short
Output edge material via Optimisation/Machining (else thickness)
This requires Optimisation Link or Machining software.
The above defaults for Edging can be overridden in
My Setup >
Misc Setup page.
Use this on machining labels instead of 'E'
When parts are nested in EzyNest and cut on the machine, labels for each part can be printed (and even automatically stuck on the part by the machine). These labels can hold various information about the part, including which side is to be 'Edged'. To make things easier for the operator, the label can have a string of 'EEEEE's along its sides/s to indicate which side/s are to be Edged.
If this option is ticked, and if the label is correctly configured, these EEE's can be replaced by the name (or thickness) of the edge material.
Only populate edge material when present on that edge
This checkbox provides the ability to only output edging material on edges that are actually edged. The required output via Optimisation Link will depend on the optimisation software in use. This option allows the thickness of the edge to be output in one field regardless of which edge is edged, or via different fields for each edge. This is in addition to the indicator to specify which edge is edged.
Premilling
A edge-bander removes a specified amount of material from the edged sides of a board. In CabMaster the part premilling allows parts to be oversized by the amount your edge bander will remove when edging parts.
For more details, see topic on Mach.General > Const page.
Manager page
Materials Manager is discussed in detail under a separate topic.
See Also