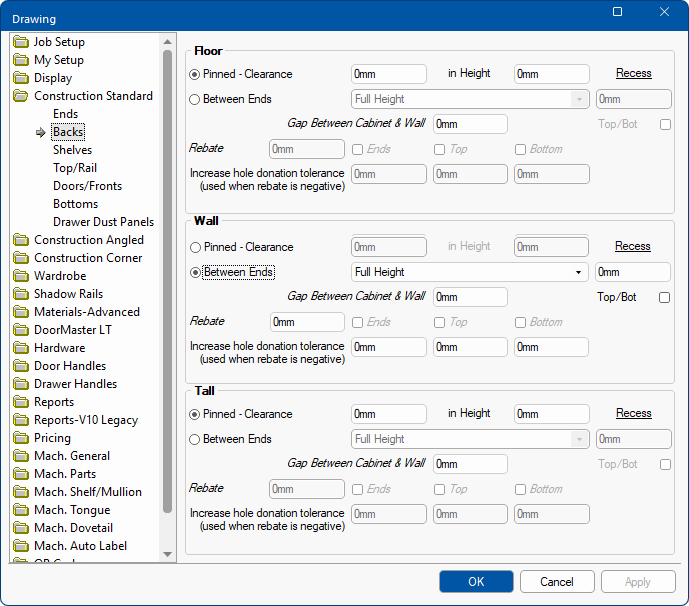

The Construction Standard > Backs page of the Catalog/Drawing Properties provides controls for the back (rear) of the cabinet.
Corner and Angled cabinets are treated as separate categories but the options discussed in this topic are applicable for both.
Construction Angled > Backs page
Construction Corner > Backs page
These defaults can be changed at cabinet level. See topic on Corner Cabinets.

Different settings are available for the different Cabinet Types i.e. Floor, Wall and Tall.
Unlike the ends, you need to choose whether you have the backs Pinned on or backs Between Ends.
Some options are greyed out (i.e. not made available for selection).
Available options are dependent on whether Pinned or Between Ends radio buttons are turned On or Off.
When a Back is pinned (planted) on the cabinet, some manufacturers like to leave a small gap in the width, and sometimes the height, to make sure that when the back is attached, it will not interfere with neighbouring cabinets. The Backs therefore need to be cut slightly smaller.
Example 1 : Back Pinned without Gap
The back is the section at the rear of the cabinet, shown here with no gaps applied.
Example 2 : Back Pinned with Gap in Width
The Width Gap is exaggerated to illustrate. To make sure that when the back is attached it will not interfere with neighbouring cabinets, only a small gap would be required.
Example 3 : Back Pinned with Gap in Height
The Height Gap is exaggerated to illustrate.
If a Gap Between Cabinet & Wall is required, enter the gap distance in the edit box provided.
If you choose to have the backs Between Ends, you need to select the position from the drop list. There are four (4) options :-
- Above bottom and flush with top.
- Below top and flush with bottom.
- Below top and above bottom.
- Full height.
Example : Full Height and Flush with Bottom
In the cabinet Preview, options (2) and (4) are displayed the same, as shown.
Recess
With the backs you also have the option to apply a Recess. The illustrations shows a Floor cabinet that has a 200mm recess applied.
The Top/Bot check box can be used in conjunction with the Recess value. When the Back is 'Pinned' or Flush with either bottom or top, then checking the box will also recess the Top and/or Bottom.
Example 1 : Top/Bot check box OFF
This illustrates the Back 'Below Top' and 'Above Bottom' with a Recess applied and the Top/Bot check box OFF
Example 2 : Top/Bot check box ON
This illustrates the Back 'Below Top' and 'Above Bottom' with a Recess applied and the Top/Bot check box ON.
As shown, the Top and Bottom are also recessed.
Back Rebate
Ends and, depending on the Between Ends selection from the drop list, the Tops and Bottoms can also be rebated. (If check box is greyed out then the option is not available for the selection).
Example : Rebate Ends Only
In this example, with Full Height selected, only the Ends are able to be rebated.
Example : Rebate Bottoms Only
In this example, with Above Bottom selected, both the Ends and the Bottoms are able to be rebated.
If Below Top is selected then both the Ends and Tops check boxes will be made available allowing these to be rebated.
Negative Rebate Tolerance
When a Back is 'Between the Ends' the Back donates construction holes (e.g. for screws) into the End. Within the machining for this is a property that dictates how far away the Back can be from the End before the donation ceases. The default for this is 1mm. So, if the back is pulled away from the End by more than this the donation does not occur. A negative rebate will shrink the Back away from the End, which some customers like to do to allow some 'wiggle room' as materials are not always their advertised thickness. At the same time they still want to screw them together.
If the back Rebate is negative, then parts may not touch each other causing construction holes not to appear. To overcome this, a value can be entered to increase the hole donation tolerance for the applicable Ends, Tops and/or Bottoms rebated.
The default tolerance values can also be set on the Mach.Parts > Back/Front page. These settings will be reflected on this page and vice versa.