CM-Cabinets Library User Guide
The cutouts can be individually controlled at Cabinet level, where you can select which ends, divisions and mullions are notched out.
Ability to add Shadow Line Rails to cabinets and :-
In this discussion we will apply the options discussed to a Floor Door cabinet but is applicable to drawers and other cabinet types.
 Watch the Video and see the topic on Shadow Rail > Settings for more on Drawers.
Watch the Video A Minute with Mike : All Things Shadow Rail [1:44]
Watch the Video A Minute with Mike : Rails in Universal Cabinets [1:23]
Add Shadow Line Rails on the Shadow Rail > Include page of the Drawing properties per cabinet type.
If Drawers enabled for Floor and Tall cabinets, then there is the ability to just have a rail for the Top Drawer Only.
Example added to Floor Door cabinet
In this example, Shadow Line Rails are added to Floor cabinet doors and drawers.
Remove the physical shadow rail but leave its cut outs on the Shadow Rail > Include page of the Drawing Properties.
When Shadow Rail is used/included, the gap is automatically calculated and used instead of the Door Gaps Top.

Labour & Construction > Construction page - Click to Expand
This example uses a Floor Door cabinet.
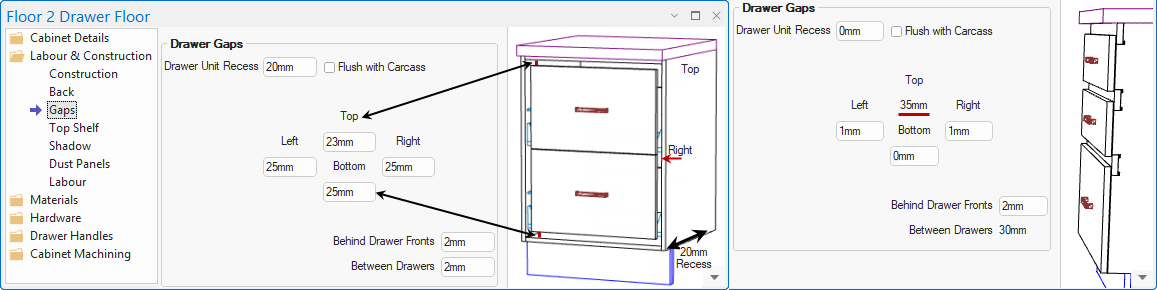
For Floor Drawer cabinets, these settings are on the Labour & Construction > Gaps page (see Tip below).
Step 1
Include Shadow Line to Floor Doors.
Step 2
On the Shadow Rail > Settings page of the Drawing Properties
- Set Height to 50mm
- Set Overlap of Top of Door to 10mm

Shadow Rail > Settings page - Click to Expand
Result
Gap of 40mm calculated. Turning OFF the shadow rail would revert the door gap to original setting.
For Floor Drawer cabinets, see the Labour & Construction > Gaps page which also allows the drawer unit to be recessed, if required.
If Shadow Rails are not included, shown below left in the preview pane, the gaps for Top and Bottom can be customised and are only applied to the top and bottom drawers. Note that Left and Right gaps is by default 1mm and the example distances are used only for visual reference.
If Shadow Rails are included, shown below right, the gap for Top applies to the Top Shadow Rail and is automatically calculated.
To remove all handles from a drawing, enable the Remove Handles option on the applicable Drawer or Door Handles > Positioning page of the Drawing Properties.
>
Door Handles > Positioning page - Click to Expand
Result
The Floor cabinet should now look like this :-
If the rail does not require edging, you can remove by unticking the relevant checkbox on the Material-Advanced > Shadow page of the Drawing Properties.

Materials-Advanced > Shadow page - Click to Expand
A Minute with Mike : Mike runs you through everything you need to know about using shadow rails in CabMaster. [1:44 mins]
How to Setup Finger Pull Handles [1:30 mins] and Shadow Rails in CabMaster. [2:43 mins] Total Time 4:18 mins


