CM-Cabinets Library User Guide
At Cabinet level, the Materials > Carcass page and Materials > Panel page discussed here, allow you to override the default settings in the Drawing Properties.
Typically, the initial setup of the materials for a new job, would be set up on the Job Setup > Materials page.
The various Reset and Reset : Material buttons can be used to revert any amendments back to the settings in the Drawing Properties.
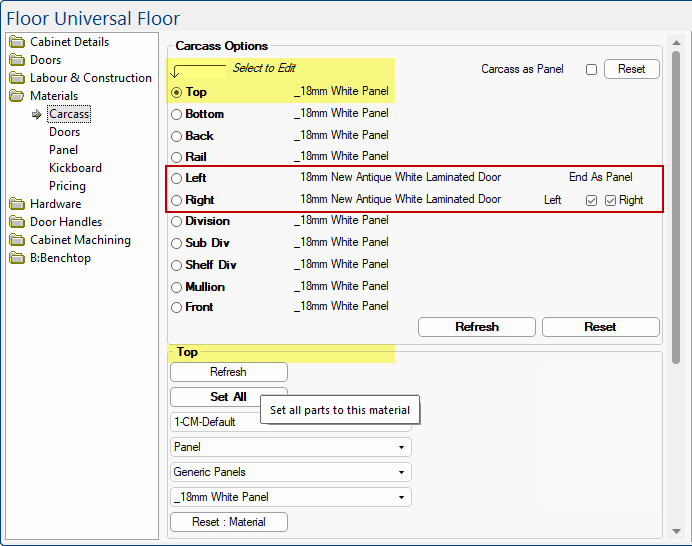
Radio buttons are used to select individual parts of the cabinet, allowing you to control the material used per part.
In the following example, the Top has been selected and the heading (highlighted) automatically changes upon selection as confirmation of material details made available for amendment.
TheReset button here will reset all parts in Carcass Options to the Drawing Properties defaults. If you make changes to the material, you must click the Refresh button.
Carcass as Panel
Tick the checkbox if you want the Carcass material to be the same as the material selected on the Materials > Panel page.
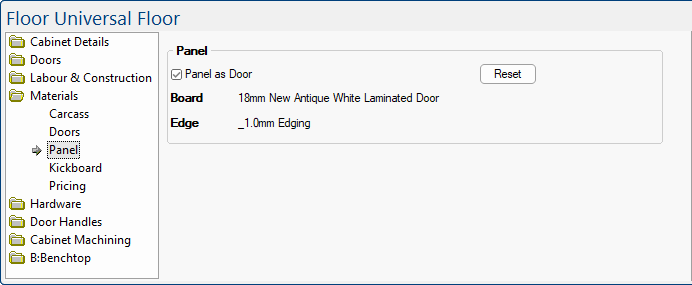
Compare this example Panel page with the image above for Carcass Left and Right panel material
You can see that the Panel as Door is selected and the material used is 18mm New Antique White Laminated Door.
Use the Reset button to revert to the option set on the Materials-Advanced > Carcass page.End as Panel
Left and/or Right panels can be set independently. If enabled, then the material will be set as per the Materials > Panel page.
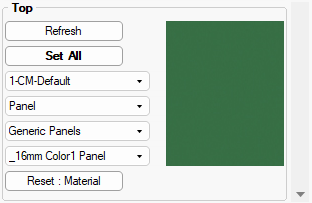
Material Selection & Set All
The Material drop lists can be used to amend the material.
- DataSource - this example, 1-CM-Default
- Material Type - this example, Panel
- Material Group - this example, Generic Panels
- Material Name - this example, _16mm Color1 Panel
- The colour of material is displayed.
If the Set All button is clicked, then all parts specified in the Carcass Options (discussed above) will be changed to this new material.
The Reset : Material button will change only the current material selection back to the Drawing default e.g. _16mm Colour1 Panel for only the Top part will be reverted to the default.
Edging
The Drawing defaults for the whole job is set on the Materials-Advanced > Carcass page but these are overridden by the defaults set on the Materials-Advanced > Carcass Edging page, where the defaults per Part within Type can be set.
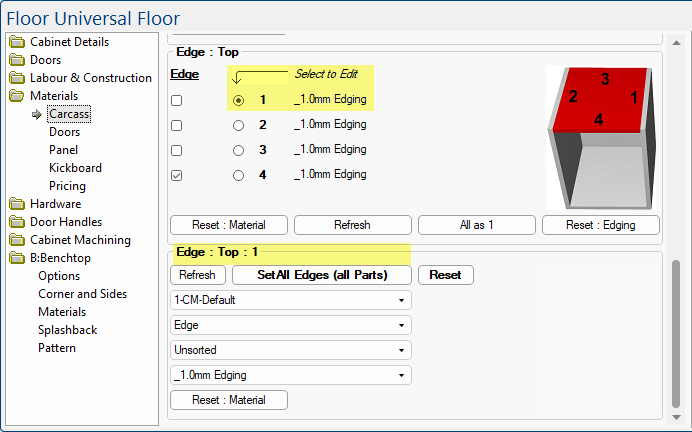
Radio buttons are used to select individual edges (as per provided image) of the selected part, allowing you to control the material used per part. Checkboxes are used to enable the edges that require edging applied.
In the following example, the Top Edge 1 has been selected and the heading (highlighted) automatically changes upon selection, specifying material details in the same way as discussed above using drop lists.
For a more detailed explanation of Edge options, see topic on Materials-Advanced > Carcass Edging page of the Drawing Properties.
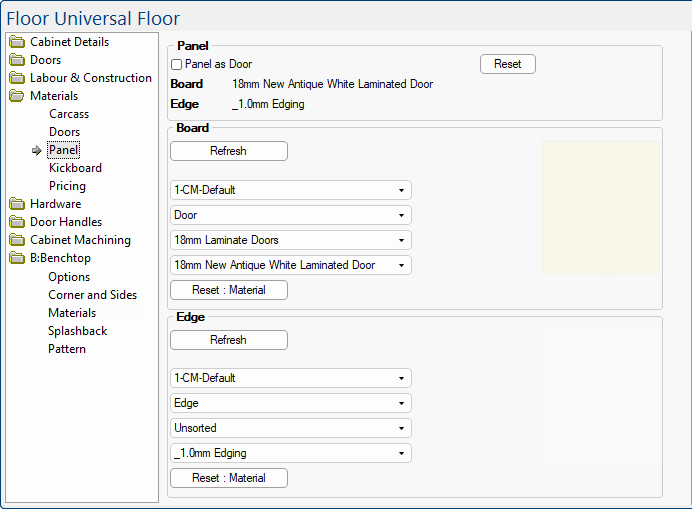
The panel settings for the cabinet will be initially set as per the Materials-Advanced > Panel page of the Drawing properties.
Enabling this option will make the Panel materials the same as that selected on the Doors page of the cabinet.
Disabling/unticking this option allows you to change the Board and Edge materials for the panel using the drop lists.
Material Selection
The Material drop lists can be used to amend the applicable material.
- DataSource - these examples, 1-CM-Default
- Material Type - this example, Edge
- Material Group - this example, Unsorted
- Material Name - this example, _1.0mm Edging