
In this tutorial, we are going to discuss how to edit an existing price table, which can be used to price any material based on its' depth.
Benchtops use a Price Table to designate single and double rolled prices. We will edit this table in the tutorial.
For more on using the Linear Price table, see tutorial on Pricing Benchtop using Price Tables.
Adding and Importing Price Tables is also discussed in a separate tutorial.
There are two ways to access a price table for editing using either the...
1) Manage : Price Tables button - see also Add/Import Price Tables
Select Folder and Table and press the Edit button which will open the selected table e.g. Linear Price.qlt
Alternate access of Manage : Price Tables button
The Manage : Price Tables button is also directly accessed on the Pricing > Material/Hardware page of the Drawing Properties and has the same functionality.
or
2) Edit : Price Table button.
Tick the Use Price Table check box which allows you to select Folder and Table;
Press the Edit button which will open the selected table e.g. Linear Price.qlt
If you are only editing a price table this way, there is no need to select a material.
However, use the Exit button on the Pricing page i.e. Do not 'Save' as this is used to save details for a selected material.
Price Table location will be under <your CabMaster folder>/ Table / Materials / Folder / Table name (.qlt)
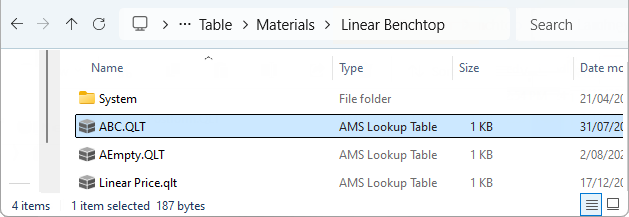
In this example in the .../Table/Materials/Linear Benchtop folder there are three tables including the Linear Price.qlt selected above.

The related Discount Table can be found in a subfolder named System within any Price Table folder, as shown above. See Editing Discount Tables.
Whatever method you use to open the Price Table, editing the table is done in the same way.
In this example, we will add a row to the Linear Price table used for Benchtop pricing because as you can see there is currently only a row for single edge pricing. So we are going to add another row for double edge pricing.
Columns: Used in this example, designate standard depths.
Rows: Used to designate whether the benchtop is Single Rolled (DF-101) or Double Rolled (DD-DF-101).
Prices: Are assumed to be per metre.
Since we already have a row for Single edge, we will add a row for Double edge pricing.
- The format is <preface><original row name>
- The <original row> used for single edge pricing is DF-101
- The <preface> for double edge pricing is DD-
- Do this for each row in the price table that can be priced as a single or double edge.
The process of adding a row to a table is the same for all table types/materials.
The row name <preface> is only important if the Allowing Double Edge Benchtop Pricing option is set on the Pricing > Settings page.
Example of Price Table used for other materials
This table is used in the Pricing Materials Advanced tutorial where the row name is the Length and a <preface> is not applicable.
Add a row by using right click menu under the Row heading, as shown.
In the New Row Label edit box enter a row name. For example, this requires a <preface> of DD- to the original row of DF-101 (Single Edge).
- The new line would be DD-DF-101, as shown, designating Double Rolled pricing.
Price by entering the relevant pricing details in the each of the columns.
- Simply type in the cell and use the <tab> key to move across each column.
- Remember in this case the price pertains to depth.
Close table and you will get a message asking you to confirm changes.
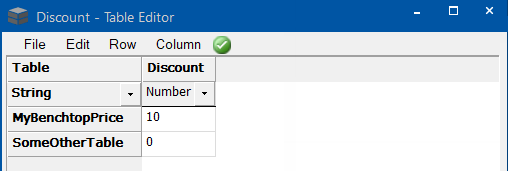
A Discount percentage can be applied. As discussed above, the Discount Table can be found in a subfolder named System within any Price Table folder.
The table contains a row for each Price table in the parent folder with a single column "Discount" for the discount to be
applied to all the values from that table.
In this example : <your CabMaster folder>\Table\Materials\Linear Benchtop\System\Discount.qlt.
In this example we will access the Price Tables from the Pricing > Material/Hardware page.
Click on the Manage : Price Tables button, as shown.
To apply a discount there are two ways to do this...
Or
This is a discount that is applied to all the values in the corresponding table.
If it does not exist or does not contain a row for the chosen table, then the discount is assumed to be zero.
To test the effect of this process, run a Quantities report using the Floor Standard cabinet with a width of 1000mm and a depth of 560mm.
See Pricing Benchtop using Price Tables : Tutorial 1 as we will apply a discount to the cabinet priced in that discussion.

The price is :-
