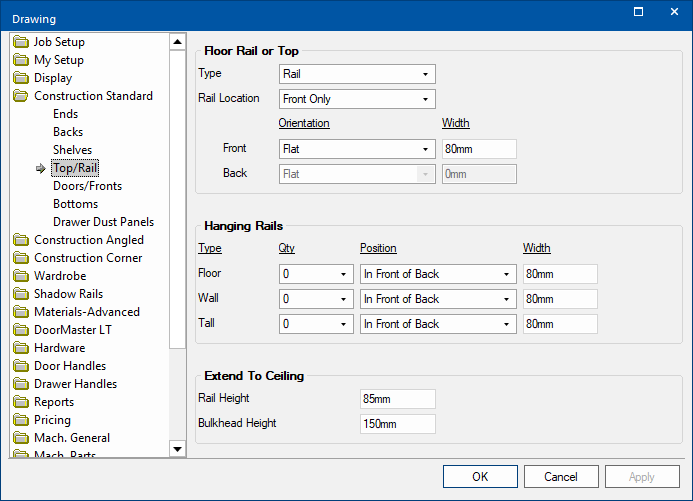

The Construction Standard > Top/Rail page of the Catalog/Drawing Properties provides options to set Hanging Rails and if Floor cabinets have Rails or Solid Tops.
Corner and Angled cabinets are treated as separate categories but the options discussed in this topic are applicable for both.
Construction Angled > Top/Rail page
Construction Corner > Top/Rail page
These defaults can be changed at cabinet level on the Labour & Construction > Construction page.

Type
- Solid Top - if selected, the rail location is not applicable and therefore greyed out.
- Rail - if selected, the Location drop list is made available.
Location
- If the Type selected above is Rail, then the Rail Location drop list allows you to select Front and/or Back.
- If you choose the Front & Back option, you can nominate a different width for each, as shown below.
Orientation
- Whether the Front and/or Back options are made available is dependent on the Location selected above.
- Select either Flat or On Edge from drop list and enter a Width of the rail in the applicable edit box.
Example
To summarise, if your construction method involves applying a rail you need to : -
- Select the Rail as the Type.
- Nominate the Location (position) of the rail.
- Determine if it is to be Flat or On Edge.
- Determine the Width of the rail.
If you choose to have the rails On Edge, you will NOT be able to have the ‘Ends Below’ the Top/Rail (see Construction Standard > Ends page). If you have selected this earlier, CabMaster will automatically turn this selection back to the default.
When the Back rail is present and Flat, the back rail automatically includes a tongue to match a groove in the back. (See note on Mach.Tongue > Rail/Mullion page).
If you use hanging rails in your construction method, these can be applied to each of the three cabinet types i.e. Floor, Wall, and Tall.
For each of the cabinet types you can :-
- Select the Quantity of hanging rails i.e. 0, 1, 2, or 3 from the drop list.
- If Qty = 1 then a Top rail will be applied.
- If Qty = 2 then a Top and Bottom rail will be applied.
- If Qty = 3 then a Top, Bottom and Mid Rail will be applied as shown.
- Nominate the Position i.e. either In Front of Back or Behind Back.
- Determine the Width of the rails.
Example
At cabinet level, all WALL and TALL cabinets have an Extend To Ceiling option. Which, when enabled, extends the height of the cabinet to the Ceiling Height specified on the Job Setup > Job Defaults page.
Using the Extend to Ceiling option does not just change the height of the cabinet, it also affects the way it is constructed by adding on a Void above the specified Internal Area (the area covered by the Door ). The Void is usually covered by a Bulkhead (which is added as a separate item as they usually cover several cabinets).
The Bulkhead Height is used to specify the height of the Void (adjusting the Internal Area and Door as required).
The Bulkhead is usually screwed into a RAIL added between the Ends at the top of the cabinet (the height of which the other default option).
Example : Elevation View