CM-Cabinets Library User Guide
This topic discusses the Cabinet Machining > Tongue page of the Cabinet Properties for Universals/Robes.
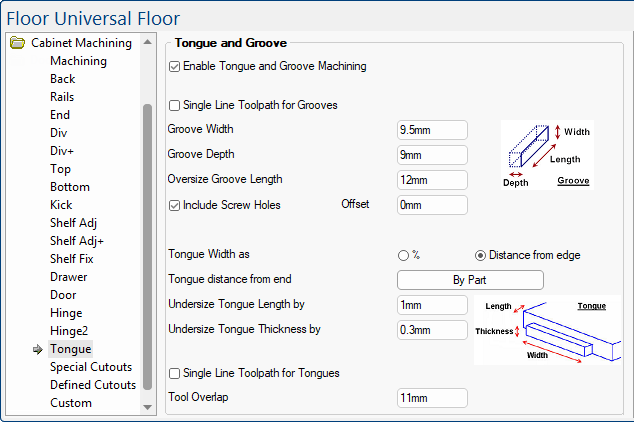
Whether the groove will be cut as one single cut on the machine. Alternatively an area can be pocketed out. The use of this option will be determined by the size of the tool and the width of the required groove.

The Width, Depth and Oversize Length edit boxes allow these to be customised.
To allow some ‘give’ a groove can be made larger than the corresponding piece that will be fitted into it.
Tick the Include Screw Holes if screw holes are also included, as well as the groove. If used the screw holes will be positioned as they would be if just screw construction was being used. See the Drawing Property defaults set in the Mach. Parts and Mach. Shelf/Mullion categories.
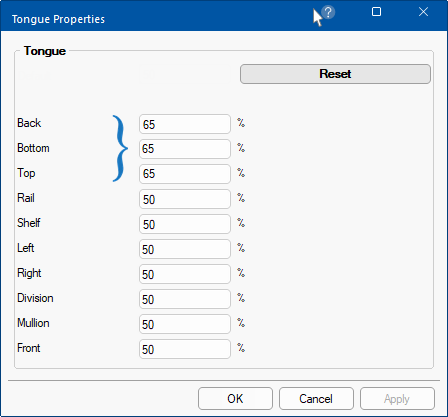
The default is set on the Mach.Tongue > Universal, Parts & Robes page of the Drawing Properties.% of side length is what proportion of the length (of the part) the tongue takes up (which is then centred on the edge).
Example: If the edge is 200mm long and the tongue is 50% then it will be 100mm long starting 50mm in from each end.
By Part button
Set the tongue as a percentage of side length by part. The Tongue Properties allows you to :-
- override default for individual parts by typing in new values as required (shown);
- reset changes back to the default value set on the Mach.Tongue > Universal, Parts & Robes page by clicking on the Reset button.
- in this example, the Back, Bottom and Top part will change back to the Default of 50%
 The default is set on the Mach.Tongue > Universal, Parts & Robes page of the Drawing Properties.
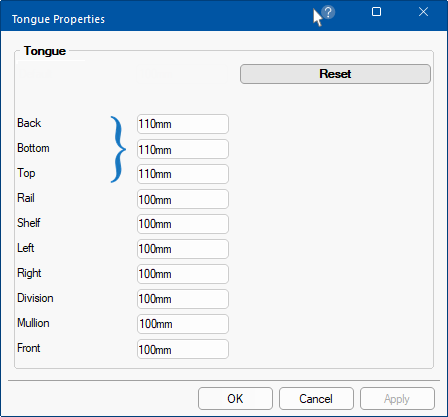
Distance (default) tongue is set from the end of part.
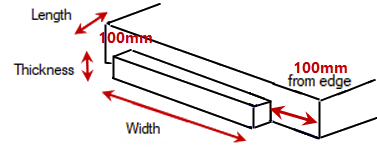
Example: Tongue distance from each end is 100mm in.
By Part button
Set the tongue as a distance from end. The Tongue Properties allows you to :-
- override default for individual parts by typing in new values as required (shown).
- reset changes back to the default value set on the Mach.Tongue > Universal, Parts & Robes page by clicking on the Reset button.
- in this example, the Back, Bottom and Top part will change back to the Default of 100mm
Undersize Length and Undersize Thickness edit boxes provided to undersize the tongue, allowing some ‘give’.
See Mach.Tongue > Settings page : Extra Notes.
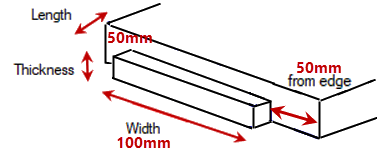
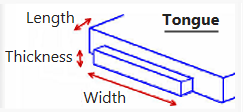
When considering what is represented by the terms Thickness, Width and Length of the tongue, consider how you would describe your own tongue. Its Thickness will be from top to bottom, Width from side to side and Length from front to back sticking out of the part.
The values entered here will, to some extent, depend on the tools and tooling strategies in operation for the groove.
For example if the Single Line Toolpath is used for the groove, then only a small under sizing of the width would be required. However, would need to be larger if this is not a Single Line Toolpath. This is because when a single line toolpath is ‘Engraved’ the centre of the tool will start and end on the start and end of the line, resulting in a natural semi circle at each end of the line extending its length. Whereas, when a pocketing the edge of the tool is kept within the defined area.
If enabled, instead of the individual pocketing of each tongue, the tool is used around the entire border of the part. In this case a Routing Offset strategy would be used for this layer (TGT) in EzyNest. See Mach.Tongue > Settings page.