Step 1 Locate relevant Runner
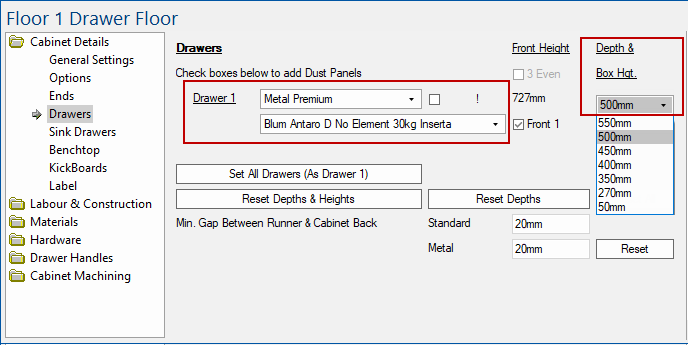
In this example we will cost the runners on a Floor 1 Drawer, which uses a 'Blum Antaro D No Element 30kg Inserta' in the Metal Premium Runners group with a depth of 500mm.
Floor 1 Drawer showing Runner used for this tutorial
The Cabinet Details > Drawers page provides the relevant information concerning the drawer runner Group/Type and the Depth.
- In step 2 you will notice that the depth's in the drop list relate to the rows in the table.
Step 2 Edit Runner
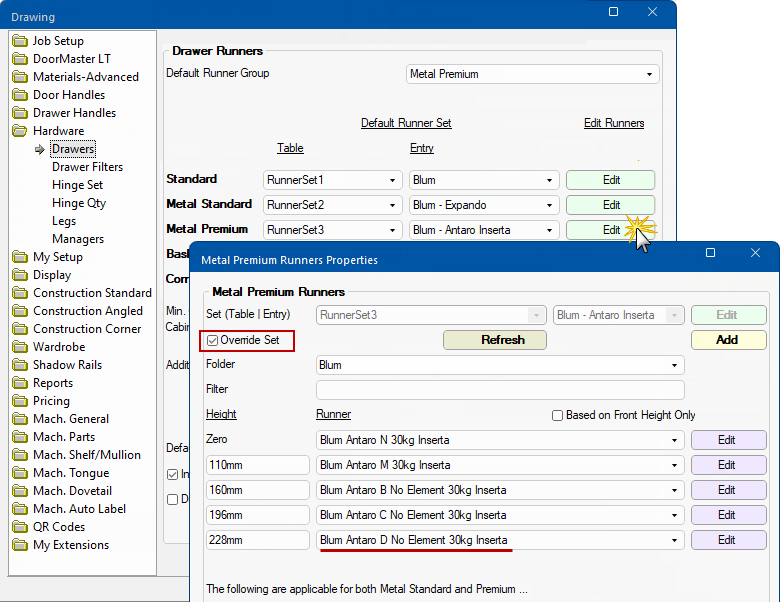
On the Hardware > Drawers page, click on the relevant Edit button (as shown).
- This will open the Properties sheet, tick the Override Set checkbox (as shown).
- This makes all the Runners that make up the selected 'Runner Set' available for Edit.
- As you can see the Runner used in our sample cabinet is underlined.
- Click on the Edit button that corresponds to the runner that needs to be priced - this will open the Runner Editor.
Step 3 Using the Runner Editor
Clicking on the Edit button opens the Runner Editor.
Runners are grouped into one of three Runner Groups, which can be changed using the radio buttons...
- Standard
- Metal Standard (includes Metabox) and
- Metal Premium (inc. TandemBox, Innotech and Grass)
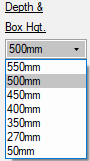
- Using the Runner Depth drop list (as shown below), select 500mm
- this corresponds to the sample drawer used for this tutorial.
- Click on the Commercial Only button
- this is a single page editor that allows just the Cost, Part number etc to be amended.
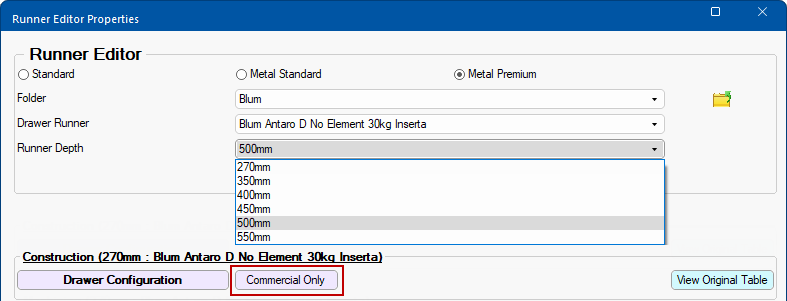
The View Original Table is only useful for viewing the current/original table and any changes made using the Form Editors will not be applied to these tables.
Step 4 Pricing for All Lengths
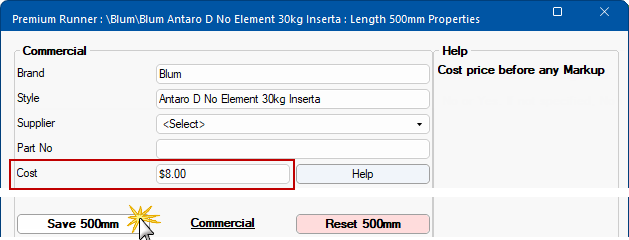
The following shows the Commercial page for our selected Runner i.e. 500mm.
Note that there are a number of different Runner Depths which will use identical pricing details e.g. for this tutorial...
- Supplier - see Pricing Hardware Accessories Tutorial 3 as this will not be discussed here.
- Markup percentage
- Labour Pricing - for now enter Time/Rate and 'No' to Use Labour as this will be discussed in Tutorial 2 below.
So to save time and effort, enter the repeat data and then click on the Save All Lengths button (as shown).
- Note that a message below this button will then confirm the Current Overrides i.e. runner depths.
Step 5 Costing Individual Depths
Now we will cost each Runner Depth.
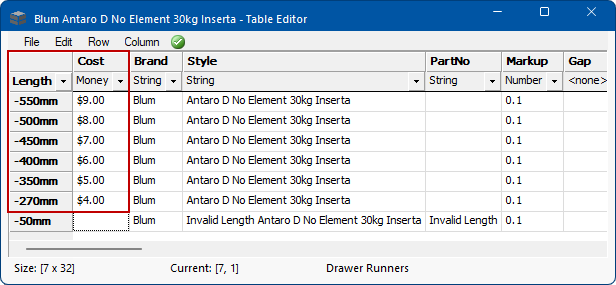
- As we already have the 500mm property sheet open, type in the Cost as $8.00;
- Remember the Markup was 10% (0.1), so the applied cost will be $8.80.
- Then click the Save 500mm button, which saves only the details for the current selection.
- To Cost all the other Runner Depths - .
- Using the Runner Depth drop list (as per Step 3)...
- select each of the other individual depths e.g. 550mm
- Type in the required Cost price (before Markup applied)
- Then click the Save... button
- Current depth will be displayed on button.
- Using the Runner Depth drop list (as per Step 3)...
In this example, enter a different Cost as per the image below i.e 550mm is $9, 500mm is $8 etc
Step 6 Cost Runners in Set
This isn't required for this tutorial but you would return to the Runner Properties discussed in Step 2 and price each of the related runners in the Set in the same way.
Step 7 Test Report
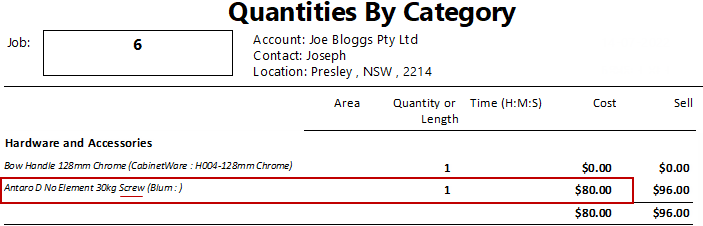
To test the effect of this process, run a Quantities report.
The following report shows that the Cost is $8 plus the Markup (10%) $0.80 = $8.80
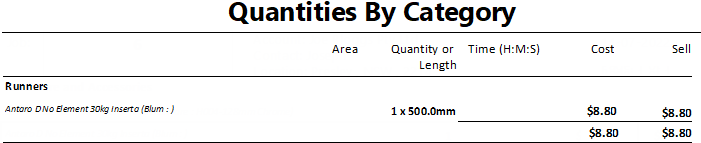
The above report shows only pricing details pertaining to this tutorial.
Rounding during the calculation process can cause amounts to increase by a few cents.
To calculate Sell price set Markup Percentages per category on the Pricing > Pricing/Markups page.