CM-Cabinets Library User Guide
In this topic we will create a new material in a step by step tutorial.
 Watch the Video to see how to create Door and Panel Material in CabMasterPro and the use of these materials in a job/drawing.
Important: The Material Group and Name must be unique, regardless of category it is in. [Especially important when interfacing with machining software]

The example above shows that 16mm Laminate is available for both Doors and Panels but is made unique by including the material type in name.
If you need to make a bulk change to the materials, you can do this directly in the tables using the CabMaster Table Editor or Excel (click here to see how). Whatever method is used, remember that any changes to the file content will need to be refreshed but there are some considerations, so see the discussion on Materials Refresh.
Additional tables are made available for download and installation via the StoreMaster shortcut buttons. For assistance, contact our CabMaster Support Team.
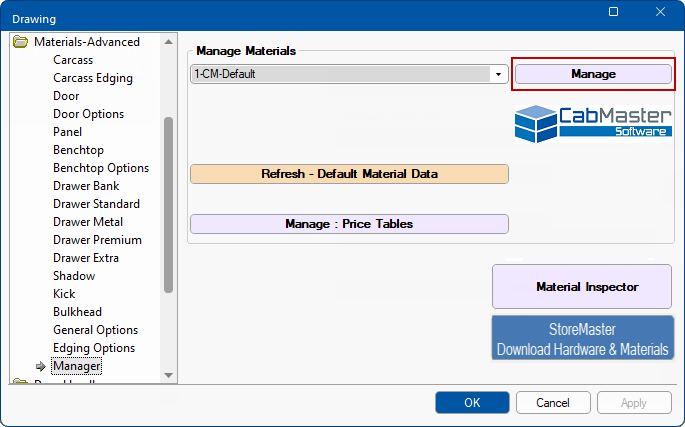
The Materials Manager provides the ability to create, modify or delete materials from any data source, as required. Assign new material textures, door styles, grain direction and even set pricing (includes accessing/using Price Tables) and markups. It is easy to use and follows the same layout as the rest of the CabMaster™ products.
The Materials Manager can be accessed in the Catalog/Drawing Properties from either the :-
Data entered in these modules will be set for all future drawings until manually overridden.
Pressing the Refresh - Default Material Data will update all materials in current job/drawing.
or
The ability to Manage Materials under the Pricing category is provided because some pricing options, such as cost per Material/Item, requires access to the Material Manager.
Material/Hardware

Pricing > Material/Hardware page also provides access to Material Manager - Click to Expand
This opens a 'Material Colour Inspector Properties' dialog which allows you to view the selected DataSource.

Click to Expand
Creating new materials is a simple step by step process.
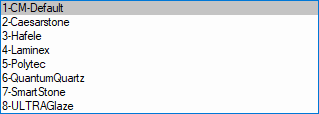
CM-Default [See topic on Materials Datasource]
You can create your own materials for these categories:
- Bench
- Door
- Edge
- Edge Profile
- Extrusion
- Face Profile
- Fascia
- Glass
- Moulding
- Panel
- Carcass material is created by adding to the Panel category
- Robe Frame*
- Robe Glass*
- Robe Mirror*
- Splash
- Timber
CM-RobeDoors [See example of Materials Inspector]
- Robe Frame
- Robe Glass
- Robe Mirror
* CM-RobeDoors Datasource sample materials are also available from the CM-Default Datasource. This allows for the option of using the CM-RobeDoors and/or add new materials to your CM-Defaults (Materials.qlt).
If you wanted to include more colours for making materials see Material Colour Creation topic.
The best way to explain how to create a new material is to go through the step by step process of creating a Door material, as this process can be applied to any of the other categories.
Watch the video at the end of this topic which discusses the creation of Door and Panel material and how these materials can be applied to your drawing.
Then follow the step by step instructions to create your own materials, the naming of which is totally up to you (as long as it is unique, as discussed above).
In this discussion we will create a new group for Formica Doors and a material in that group.
Open the Drawing Properties [F4] and go to the Materials-Advanced > Manager page.

Materials-Advanced > Manager page includes DataSource drop list - Click to Expand
The Materials-Advanced > Manager page has an added ability to select from the DataSource drop list. CabMaster Software™ uses a default set of materials [CM-Default] that can be customised to the user’s preference.
If you want to add/update materials, including materials from your preferred supplier that are stored in a separate database, you can select here.
These materials relate to My Setup > Material DataSource of the Drawing Properties.
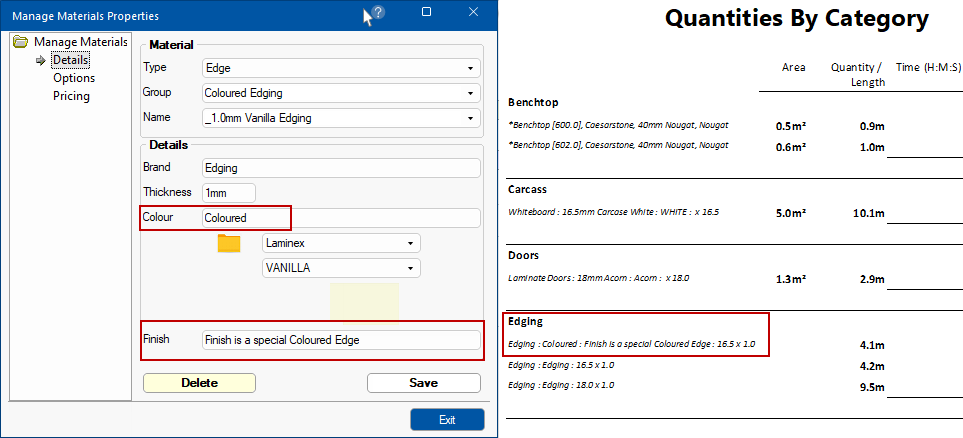
The first step is to create a new material Name and specify Brand, Thickness, Colour and an optional Finish details.
In this tutorial we will also create a new material Group.
Manage Materials > Details page showing what we want to achieve
When you open the Manage Materials > Details page you will see the details of an existing material, note that the page has Delete and Save buttons (click on image to view) which we will discuss later.
As we create our new material the Save button will change to a Save As button (as per image).

Enter in new Group and/or Name and other details - Click to view page prior to change with Save button
Select the Details page and enter the following settings to create a new Group for Formica Doors and a new material Name in that group:
| Type | Select 'Door' from the category drop list |
| Group |
Type in the edit box 18mm Formica Doors Important: This name must be unique, regardless Type/category - see note and example above! |
| Name |
Type in the edit box 18mm Adobe Stucco Important: This name must be unique, regardless of Type/Group it is in. |
| Brand |
Type in the edit box Formica This detail is mostly used for reporting. |
| Thickness | Type in the edit box 18mm |
| Colour | Type in the edit box Adobe Stucco |
| Folder |
From the drop list of current selection of colours, select:- 1st folder - set to Formica 2nd folder - set to Adobe Stucco (a colour within the Formica range) |
| Finish |
Optional. Reports will include group by Finish, if used. Example of finish could be Satin, Gloss, Matt etc which will be included in reports Example shows the Quantities RDL Report Edging includes grouping by Finish.
|
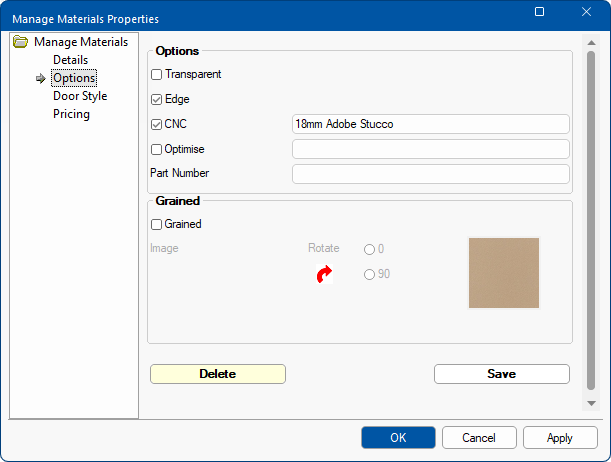
Next select the Options page and answer the questions concerning the newly created material.
Manage Materials > Options page showing what we want to achieve
| Option | For Consideration |
| Transparent | Is the material entirely transparent? |
| Edge |
Should the material have edging applied to it? Only applies to Bench and Doors. For this example we have enabled Edging by ticking the checkbox. |
| CNC |
Does the material need to be sent to the CNC for machining? If Yes, what name to use? In this example, enable CNC machining by ticking the checkbox and enter in 18 Adobe Stucco. Note materials given the same CNC name as each other will be nested together when machined. This means that the CNC name for Panel and Door being sent for machining together need to have the same name. |
| Optimise |
Is this material to be sent to the optimiser for cutting on a beam saw? If Yes, what name to use? See documentation on Panel Estimator |
| Part Number | Enter part number of the material if required on reports. |
| Grained |
Is this a grained material? If Yes, does it have to be rotated 90 degrees? |
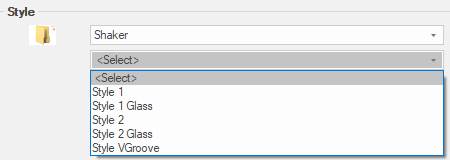
The Door Style is only applicable to Door Materials and defines what profile (if any) will be applied to the door.
Manage Materials > Door Style page showing what we want to achieve
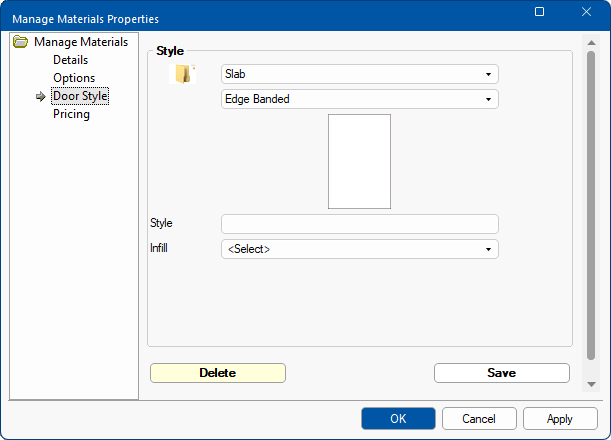
| Style Folder 1 |
Select from the drop list which has a range of categories for various door styles. Ensure that something is selected otherwise you will have problems at a later stage. Used in this example is the most common i.e. Slab
|
| Style Folder 2 |
Select from the drop list provided, which is dependent on above Style i.e. with a Slab you will be presented with a selection choice of Edge Banded or Flat Panel. For this example we will select Edge Banded which will be applied to the material. If you select, for example a Shaker Style door, you will presented with different choices:-
|
| Style | Optional. You can enter the name of the style for reporting purposes. |
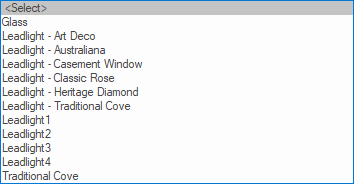
| Infill |
You can select from the drop list an applicable infill style.
|
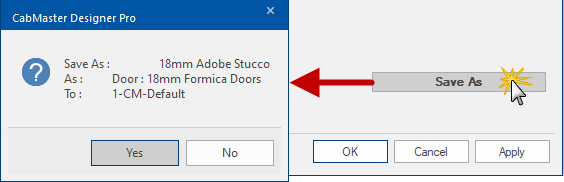
We will discuss Pricing later but for now we will save our newly created material.
Click the Save As button. You will be asked to confirm, as per example. If correct, press Yes.
Finally, press OK to save and close dialog, as shown below.
Note that a Delete button is now made available if you decide to that you no longer want this material.
Your new material has been saved and is ready to be used in CabMaster.
Since this newly created material is a Door style go to the Materials > Doors page of the Cabinet Properties.
Here you will see that our newly created material is available for selection.

Materials > Door page of the Cabinet Properties - Click to Expand
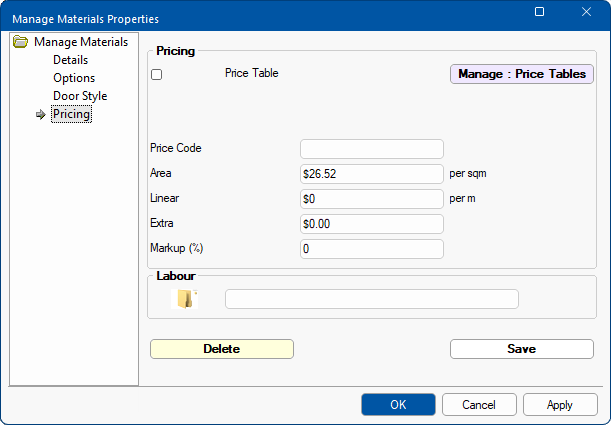
There are a number of ways to price within CabMaster, so the following is just a simple explanation of options on the Pricing page.
Manage Materials > Pricing page
| Option | Explanation of Option |
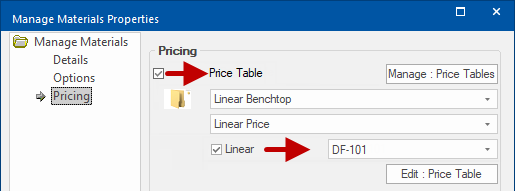
| Price Table |
Use a price table for pricing any material based on its length and depth such as in the case of pricing Benchtops. Drop lists allow you to select applicable folder/table files. To edit selected price table use the Edit: Price Table button. The Manage : Price Tables button is here only for convenience and has same functionality as button on the Pricing > Material/Hardware page.
Price Table based on length and depth Pricing, if the Treat as Linear is unticked, is calculated on the premise that measurement is ≤ Depth and ≤ Length i.e... If the Length is between 1mm and 230mm then the Row heading of 230mm will be used and..
Treat as Linear enabled/ticked is used with Benchtops as materials are priced only on depth. Linear Price table based on depth only
|
| Price Code |
Each door material can have a default Door Price Group associated with it (a whole number between 0 and 10). If Use Price Groups is enabled and no default exists then the system will apply 1 as the default. |
| Area |
Price per sqm that can be set for all appropriate materials e.g. this could correspond to your supplier's price lists. Can be used in conjunction with Price Table and Extra price per item. See topic Pricing Materials Advanced. |
| Linear |
Used in conjunction with the calculated linear length of material to create the cost price automatically. See topic Pricing Materials Linear Rate. |
| Extra | Useful if accounting for fixed prices associated with material. |
| Markup | A percentage markup applied to the total cost. |
| Labour |
Used if you are going to base your pricing on labour. The LabourTableFolder column is an optional column that can be added to the materials table. |
How to use Materials Manager to create Door and Panel Material in CabMaster (14:59 mins)
 in the Application User Guide for more details.